
AngularJS – AJAX and routing
Unit: 16 of 19
Earlier I mentioned that AngularJS data can be delivered very efficiently using services. This is also an example of the best practice that must be followed when working with this framework . So far, we have learned very important segments of AngularJS and we are left to look at server-side content delivery techniques as well as routing techniques. In this lesson we will deal precisely with routing and AJAX through AngularJS.
AngularJS – $http servis
The first part of the lesson is reserved for working with AJAX and asynchronous communication with the server. Here we will familiarize ourselves with one of the core services in AngularJS.
| Note: To use HTTP protocols for asynchronous communication with the server and for serving data through AngularJS, we use the $http service. |
Let’s look at the syntax for $http:
|
1
|
$http({}); |
It is therefore about the function that accepts an argument in the form of an object. This object is called a configuration object . With the help of this service we can communicate with the server through the HTTP protocol, where we configure the request by setting the configuration object.
At the configuration object we can define different properties depending on the request we want to send, for example, if we want to set the method properties with the POST method, url, headers and data . Although the property names are intuitive enough, it should be emphasized that the data property serves to define the POST parameters.
According to the syntax that is now considered obsolete, but can still be used, on the response object we could call the success() or error() method, which would be activated if the communication was executed successfully ( success() ) or was unsuccessful ( error () ). Instead, we’ll use a new syntax and call the then() method, which we could represent as follows:
|
1
|
$http({}).then(); |
This method accepts two arguments in the form of the functions that will be enabled for successful or unsuccessful communication.
The syntax might now look like this:
|
1
|
$http({}).then(function successCallback(response) {}, function errorCallback(response) {}); |
Notice the existence of the response object . This object is the source of all the information we need about the response from the server.
The following table shows the most important properties of the response object:
| Property | Tip | Description |
| data | {string|Object} | Body transformed corresponds. |
| status | {number} | The HTTP status of the request. |
| headers | {function([headerName])} | Header getter function. |
| config | {Object} | The configuration object used to make the request. |
| statusText | {string} | The HTTP status text of the response. |
Table 16.1. The most important properties of the response object
To present what is explained in a practical example, we will modify one of the examples from the previous lesson. It is about the example related to the creation of the custom filter and the search for mobile phones. At that time, the mobile phone data was encoded in JavaScript and I only specified that it was delivered by the services. We will now place the data in an external file and deliver it to the JSON syntax.
Let’s define the problem:
PROBLEM 1
Problem Statement: Modify the search example shown earlier and ensure that the data is retrieved from the server using the GET method. The fetched data is stored in the root scope ($ rootScope)
PROBLEM 1 – Solution (first part): HTML : index.html
|
1
2
3
4
5
6
7
8
9
10
11
12
13
14
15
16
17
18
19
20
|
<!DOCTYPE html><html><head> <link href="style.css" rel="stylesheet"/> <script src="https://ajax.googleapis.com/ajax/libs/angularjs/1.3.15/angular.min.js"></script> <script src="script.js"></script></head><body ng-app="searchApp"><div class="bar"> <input type="text" ng-model="searchString"></div><ul> <li ng-repeat="item in items | searchFor:searchString"> <img ng-src="{{item.image}}"> <h3>{{item.name}}</h3> <p>{{item.description}}</p> </li></ul></body></html> |
We didn’t create any controller because we don’t need it for this example. Although we could use the service through the controller, to show how the run() method works , we will not use such a controller here.
We also set the necessary CSS:
PROBLEM 1 – Solution (part two): CSS : style.css
|
1
2
3
4
5
6
7
8
9
10
11
12
13
14
15
16
17
18
19
20
21
22
23
24
25
26
27
28
29
30
31
32
33
34
35
36
37
38
39
40
41
42
43
|
*{ margin:0; padding:0;}body{ color: #5e5b64; text-align:center;}.bar{ border-radius: 2px; width: 400px; padding: 14px; margin: 80px auto 20px; position:relative;}.bar input{ width: 100%; height: 40px; font-size: 20px;}ul{ list-style: none; width: 428px; margin: 0 auto; text-align: left;}ul li{ border-bottom: 1px solid #ddd; padding: 10px; overflow: hidden;}ul li img{ width:60px; height:60px; float:left; border:none;}ul li p{ margin-left: 75px; font-weight: bold; padding-top: 12px; color:#6e7a7f;} |
To get the data from the service, we need to create a file from which we will provide this data. That’s why we’ll create the getItems.php file with the following content:
PROBLEM 1 – Solution (third part): PHP : getItems.php
|
1
2
3
4
5
6
7
8
9
10
11
12
13
14
15
|
<?phpecho '[ { "name" : "Alcatel Idol 3", "description" : "IDOL 3 packs a powerful 3-in-1 experience, with great sound, Full HD display and industry-leading camera.", "image" : "alcatel_img.jpg" },{ "name" : "ZTE Blade 3", "description" : "The ZTE Blade III is a cheap Android Smartphone with a 1.0Ghz processor and an impressive 4-inch screen", "image" : "zte_img.jpg" },{"name" : "Lenovo A5000", "description" : "The DUAL SIM Lenovo A5000 has a quick charge battery and energy-saving software.", "image" : "lenovo_img.jpg" }]'?> |
All that remains is to create and explain the script.js file. From the beginning we will remove the controller from the previous example because we explained earlier that we don’t need it anymore. The code would now look like this:
PROBLEM 1 – Solution (fourth part): JavaScript : script.js
|
1
2
3
4
5
6
7
8
9
10
11
12
13
14
15
16
17
18
19
20
|
var searchApp = angular.module("searchApp", []);searchApp.filter("searchFor", function(){ return function(arr, searchString){ if(!searchString){ return arr; } result = []; searchString = searchString.toLowerCase(); angular.forEach(arr, function(tel){ if(tel.name.toLowerCase().indexOf(searchString) !== -1){ result.push(tel); } }); return result; }}); |
Now we will set the run() method which will be activated after loading. The syntax would be:
|
1
|
searchApp.run(function($rootScope, $http){}); |
We notice that the function accepts two arguments. The first is the root scope which is required in the problem statement, while the other is the $http object we talk about all the time.
Now we can use this service and make the request:
To configure, we need to set method and url . This will look like this for our example:
|
1
2
|
method: 'GET',url: 'getItems.php' |
If for some reason the request cannot be executed successfully, we may notify the user of this in the following way:
|
1
|
alert('AngularJS HTTP error!') |
On the other hand, if everything is fine with the request, the fetched data should be stored in $rootScope. I mentioned earlier that the response object has the data property where the information we are interested in is located. So our full code for script.js might look like this:
PROBLEM 1 – Solution (part five): JavaScript : script.js
|
1
2
3
4
5
6
7
8
9
10
11
12
13
14
15
16
17
18
19
20
21
22
23
24
25
26
27
28
29
30
31
32
33
|
var searchApp = angular.module("searchApp", []);searchApp.filter("searchFor", function(){ return function(arr, searchString){ if(!searchString){ return arr; } result = []; searchString = searchString.toLowerCase(); angular.forEach(arr, function(tel){ if(tel.name.toLowerCase().indexOf(searchString) !== -1){ result.push(tel); } }); return result; }});searchApp.run(function($rootScope, $http){ $http({ method: 'GET', url: 'getItems.php' }).then( function(response){ $rootScope.items = response.data; }, function(){ alert('AngularJS HTTP error!') } );}); |
We can also see the request in the console:
![]()
Image 16.1. Appearance of requests in the console
We could also present the entire delivered JSON:

Imaginea 16.2. AngularJS JSON
The output on the page is the same as for the example where we encoded the data:

Image 16.3. AngularJS JSON – sample output
The difference is that this time we delivered the data as a service. This data delivery can also be executed after the registration of any event.
| Note: The complete code for this example can be found in the materials for this lesson. |
| EXERCISE According to the logic already presented, complete the previous example, so that the text from the description of the element is also taken into account by the search. |
Client-side routing
The classic routing method involves sending requests to the server and delivering the entire document that loads on the page. If we had the ability to perform client-side routing , we could, via AJAX , deliver only the necessary parts of the page, and the rest, which remains unchanged, would not load.
We could graphically display this:
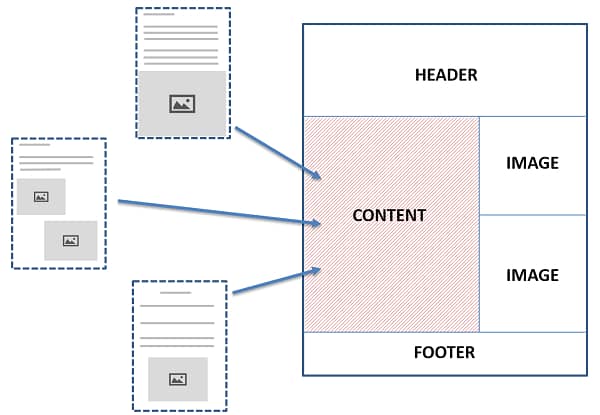
Image 16.4. AngularJS Template
So the static parts of the page (header, image and footer) do not load again, while the central part (content) is variable. Let’s show this with an example.
PROBLEM 2
Problem Statement: Create an application that has some links. With a click on the link, routing is done on the client side and the new content placed in the view is delivered. Content is served from external .html files.
To be able to create a client-side routing, we need an additional module that is not a default part of the AngularJS package, and therefore we need to download it and implement it on the page. We will open the title page ( https://angularjs.org/ ), select the Download button and click on the link: Browse additional modules :
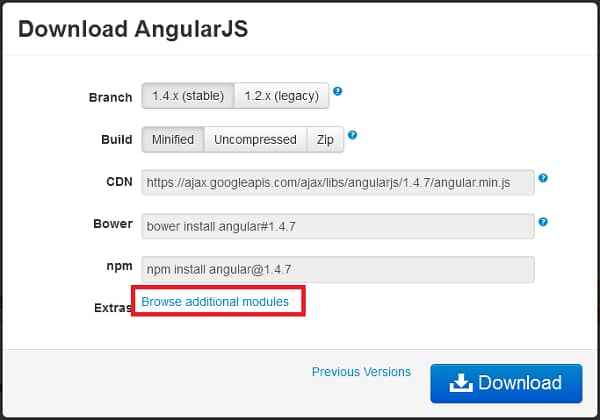
Image 16.5. AngularJS – additional modules
In the new window we will open the link: angular-route.min.js:
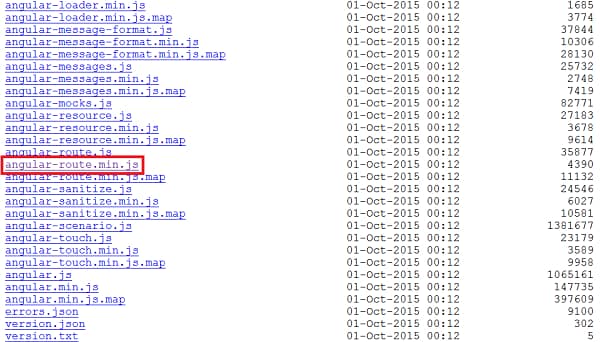
Image 16.6. AngularJS – link for additional module
We will download this package and deploy it with the following snippet:
|
1
|
<script src="angular-route.min.js"></script> |
We will now create index.html which will represent our introductory page:
PROBLEM 2 – Solution (first part): HTML : index.html
|
1
2
3
4
5
6
7
8
9
10
11
12
13
14
15
16
17
18
19
20
|
<!DOCTYPE html><html><head> <script src="https://ajax.googleapis.com/ajax/libs/angularjs/1.3.15/angular.min.js"></script> <script src="angular-route.min.js"></script> <script src="script.js"></script></head><body ng-app="routeApp"><div> Choose: <a href="#page1">Page 1</a> | <a href="#page2">Page 2</a> | <a href="#page3">Page 3</a> | <a href="#page4">Page 4</a> | <a href="#page5">Page 5</a><br/> <div ng-view></div></div></body></html> |
I set some links and defined the href attribute for them. This link structure allows us the easiest navigation. Clicking on the link will not open a new page, but routing will be done on the client. The bottom div has an ng-view directive with which we define this div as the view for our application.
Now we create external HTML files that we will deploy here on click. These files should be stored in the “view” folder:
PROBLEM 2 – Solution (part two): HTML page1.html:
|
1
2
3
4
5
6
7
8
9
10
11
12
13
14
15
16
17
18
19
20
21
22
23
24
25
26
|
<h1>Page 1</h1><p>Content 1</p>page2.html:<h1>Page 2</h1><p>Content 2</p>page3.html:<h1>Page 3</h1><p>Content 3</p>page4.html:<h1>Page 4</h1><p>Content 4</p>page5.html:<h1>Page 5</h1><p>Content 5</p> |
Now we create the most important part of the code that we will store in the script.js file:
PROBLEM 2 – Solution (part three): JavaScript : script.js
|
1
2
3
4
5
6
7
8
9
10
11
12
13
14
15
|
var routeApp = angular.module("routeApp", ['ngRoute']);routeApp.config(function($routeProvider){ $routeProvider.when('/page1', { templateUrl: "view/page1.html" }).when('/page2', { templateUrl: "view/page2.html" }).when('/page3', { templateUrl: "view/page3.html" }).when('/page4', { templateUrl: "view/page4.html" }).when('/page5', { templateUrl: "view/page5.html" });}); |
In the first line we created the variable that represents our module, routeApp. This syntax is already known to us, but the novelty is that in the square brackets, now as an element of the string there is the string “ngRoute”, with which we highlight that this external module must be included in our application.
In order for the routing to work correctly, we need to configure the application.
| Note: Configuration is done with the config() method . |
The function accepts the $routeProvider service which has the when() method. This method will be called after a click on the link. As in the case of the jQuery library , we can also use concatenation in a method chain here. The first argument to this function is the URL to call in routing. The second argument is the object with which we can set various properties. The most important property is the template Url, with which we indicate where the template is located. Here we set the path to our external HTML file. We repeat the same procedure for each link.
Now our application is complete and we can see it in the browser:

Image 16.7. AngularJS – route output
| PROBLEM: Following the pattern of the previous example, create a site with a theme of your choice, where routing will be done on the client side. |
The use of the HTTP protocol for asynchronous communication with the server and providing data through AngularJS is done through the service: