
AngularJS – Filters and Methods
Unit: 15 of 19
In the previous lesson we familiarized ourselves with the working logic of the AngularJS framework , and then we saw how we can use directives , controllers, etc. By combining this knowledge we can create very complex applications. However, in order to create SPA or similar applications where AngularJS could demonstrate its full power, we need to know AJAX administration, filters, routing and some of the most important methods of manipulating data collections, which we will in this lesson and the next.
I mentioned that AngularJS data is usually delivered by services (although there is no requirement for this, it would be a good practice to follow). The data thus obtained are delivered most often through a collection. With this in mind, we immediately start thinking about how we can process such data collections. Precisely for this reason, we will explain at the very beginning of the lesson the use of the AngularJS forEach() method.
To familiarize ourselves with this method through a practical example, we will pose the problem and through the solution we will show the syntax of the forEach() method and see in which situations its use can be useful.
PROBLEM 1
Problem Statement: Create an AngularJS application that retrieves the list of elements from a string and displays it on the page. Items listed are items for sale. Next to each element, the price is also expressed. By selecting each item, the final amount that the customer has to pay is calculated. By default, the first and fourth elements are selected for the client. The calculation is done in real time.
The first step to solving this problem is to create a basic HTML structure and implement AngularJS. Therefore, we will create an index.html file:
PROBLEM 1 – Solution (first part): HTML : index.html
|
1
2
3
4
5
6
7
8
9
10
11
|
<!DOCTYPE html><html> <head> <meta charset="utf-8"/> <title>Form</title> <link href="style.css" rel="stylesheet" /> <script src="https://ajax.googleapis.com/ajax/libs/angularjs/1.3.15/angular.min.js"></script> </head> <body ng-app="form" ng-controller="formController"> </body></html> |
You should notice that we immediately set both the application definition and the controller:
|
1
|
ng-app="form" ng-controller="formController" |
To achieve transparency and not interfere the presentation part with the part responsible for the logic, we will create an external .js file that we will include in index.html. We’ll call this file script.js. In this file we will immediately set the code sections necessary to define the application and the controller:
PROBLEM 1 – Solution (part two): JavaScript : script.js
|
1
2
3
|
var form = angular.module("form", []);form.controller("formController", function($scope){}); |
As you can see, the name of the module is “form” and the name of the controller is “formController”, which matches the attribute values in the index.html file.
Let’s create a data collection. Otherwise, such a collection could be provided with a service, but since server logic is not the focus of this course, we will try to reduce its use.
Each item provided to the user must have its name and price set. In addition to these, we need to somehow determine whether the element has been marked by the user or not. We can also select some items for the user, which is one of the requirements specified in the problem statement.
So we add this piece of code to our script.js file:
PROBLEM 1 – Solution (part three): JavaScript : script.js
|
1
2
3
4
5
6
7
8
9
10
11
12
13
14
15
16
17
18
19
20
21
22
23
24
25
|
var form = angular.module("form", []);form.controller("formController", function($scope){$scope.items = [ { name: 'Content Management System', price: 500, active:true },{ name: 'Document Management System', price: 400, active:false },{ name: 'Membership System', price: 250, active:false },{ name: 'Event Booking System', price: 120, active:true } ];}); |
We have already familiarized ourselves with the ng-repeat directive (if you are not familiar with this directive, the advice is to go back to the previous lesson and study it, after which you can continue this example). This directive is ideal for displaying elements in this structure in the presentation section of the application. Therefore, we will change the index.html file :
PROBLEM 1 – Solution (fourth part): HTML : index.html
|
1
2
3
4
5
6
7
8
9
10
11
12
13
14
15
16
17
18
19
20
|
<!DOCTYPE html><html> <head> <meta charset="utf-8"/> <title>Form</title> <link href="style.css" rel="stylesheet" /> <script src="https://ajax.googleapis.com/ajax/libs/angularjs/1.3.15/angular.min.js"></script> <script src="script.js"></script> </head> <body ng-app="form" ng-controller="formController"> <form> <h1>Website services</h1> <ul> <li ng-repeat="item in items"> {{item.name}} <span>{{item.price | currency}}</span> </li> </ul> </form> </body></html> |
We won’t explain the HTML elements, because they are all more than familiar to you by now. Notice that, using the ng-repeat directive, I’ve looped through each element and presented them in the appropriate place ( {{}} ). Here we also notice the use of a filter that appears after the vertical line (pipe – |).
| Note: Filters can be added to AngularJS expressions and directives using the vertical line (pipe – |). Filters serve to transform the data they refer to. |
We will talk more about filters in the second part of the lesson.
In order to make our application more transparent and attractive to the end user, we will create a basic CSS that we will not comment, because the CSS syntax is now more than familiar to you:
PROBLEM 1 – Solution (part five): CSS : style.css
|
1
2
3
4
5
6
7
8
9
10
11
12
13
14
15
16
17
18
19
20
21
22
23
24
25
26
27
28
29
30
31
32
33
34
35
36
37
38
39
40
41
42
43
44
45
46
47
48
49
50
51
52
|
*{ margin:0; padding:0;}body{ text-align:center; background-color:#696969;}form{ margin: 80px auto; width:600px;}form h1{ color:#fff; font-size:64px; font-weight: normal; line-height:1; text-shadow:0 3px 0 rgba(0,0,0,0.1);}form ul{ list-style:none; color:#fff; font-size:20px; font-weight:bold; text-align: left; margin:20px 0 15px;}form ul li{ padding:10px 30px; background-color:#cc0000; margin-bottom:8px; box-shadow:0 1px 1px rgba(0,0,0,0.1); cursor:pointer;}form ul li span{ float:right;}form ul li.active{ background-color:#339900;}div.total{ border-top:1px solid rgba(255,255,255,0.5); padding:15px 30px; font-size:20px; font-weight:bold; text-align: left; color:#fff;}div.total span{ float:right;} |
Now our application looks like this:
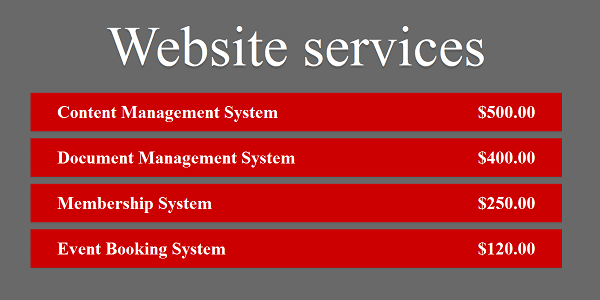
Image 15.1. AngularJS Website services – example
Here we already notice that two elements are set as marked by default, but this is not visible in the display. Let’s remember what the data structure looked like:
|
1
2
3
4
5
6
7
8
9
10
11
12
13
14
15
16
17
18
19
|
$scope.items = [ { name: 'Content Management System', price: 500, active:true },{ name: 'Document Management System', price: 400, active:false },{ name: 'Membership System', price: 250, active:false },{ name: 'Event Booking System', price: 120, active:true } ]; |
In styling, the class that changes the appearance of the element is set. It only needs to be assigned to each marked element. We can do this using the ng-class directive.
| Note: The ng-class directive allows dynamic management of CSS classes on the HTML element. |
After the colon, we put the boolean value to determine whether or not the element has the specified class. So we’ll add this directive to index.html:
PROBLEM 1 – Solution (part five): HTML : index.html
|
1
2
3
4
5
6
7
8
9
10
11
12
13
14
15
16
17
18
|
<!DOCTYPE html><html> <head> <meta charset="utf-8"/> <title>Form</title> <link href="style.css" rel="stylesheet" /> <script src="https://ajax.googleapis.com/ajax/libs/angularjs/1.3.15/angular.min.js"></script> <script src="script.js"></script> </head> <body ng-app="form" ng-controller="formController"> <form> <h1>Website services</h1> <ul> <li ng-repeat="item in items" ng-class="{active:item.active}"> </ul> </form> </body></html> |
Now let’s look at the layout of our part:
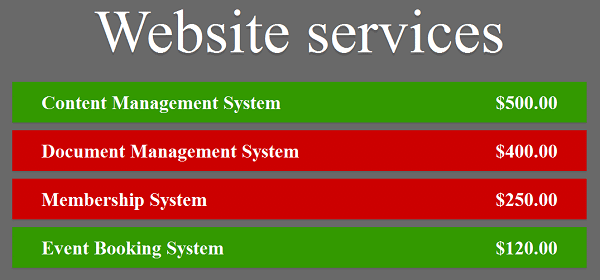
Image 15.2. AngularJS Website services (2)
As we can see, now everything is fine regarding the initial selection of elements. However, it is necessary to provide the user with the ability to enable or disable one of these elements with a click on them. The ideal directive for such needs is ng-click.
| Note: The ng-click directive allows defining application-specific behavior after clicking on the element over which the directive is defined. |
Therefore, we will set this directive for each LI tag and call the toggleActive() method, to which we will pass the current element:
PROBLEM 1 – Solution (part six): HTML : index.html
|
1
2
3
4
5
6
7
8
9
10
11
12
13
14
15
16
17
18
19
|
<!DOCTYPE html><html> <head> <meta charset="utf-8"/> <title>Form</title> <link href="style.css" rel="stylesheet" /> <script src="https://ajax.googleapis.com/ajax/libs/angularjs/1.3.15/angular.min.js"></script> <script src="script.js"></script> </head> <body ng-app="form" ng-controller="formController"> <form> <h1>Website services</h1> <ul> <li ng-repeat="item in items" ng-click="toggleActive(item)" ng-class="{active:item.active}"> </ul> </form> </body></html> |
We’ll immediately create this function so that the ng-click directive makes sense:
PROBLEM 1 – Solution (part seven): JavaScript : script.js
|
1
2
3
|
$scope.toggleActive = function(s){ s.active = !s.active; }; |
Observe the logic of this function. After the click, the element is accessed and its active property is changed . It is clear that the value for assets is a boolean value. Since our function needs to perform the toggle, it is sufficient to negate the existing value by setting the negation operator (!) at the beginning.
Now the ng-click directive works correctly and we can see this on the page after clicking the second element:
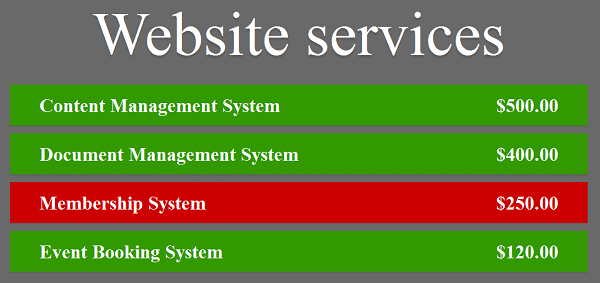
Image 15.3. AngularJS Website services (3)
The last requirement for our problem is to calculate the total sum for the selected items. Here the AngularJS forEach() method is highlighted. First, we modify the index.html file so that it can display the output:
PROBLEM 1 – Solution (part six): HTML : index.html
|
1
2
3
4
5
6
7
8
9
10
11
12
13
14
15
16
17
18
19
20
21
22
23
24
|
<!DOCTYPE html><html> <head> <meta charset="utf-8"/> <title>Form</title> <link href="style.css" rel="stylesheet" /> <script src="https://ajax.googleapis.com/ajax/libs/angularjs/1.3.15/angular.min.js"></script> <script src="script.js"></script> </head> <body ng-app="form" ng-controller="formController"> <form> <h1>Website services</h1> <ul> <li ng-repeat="item in items" ng-click="toggleActive(item)" ng-class="{active:item.active}">{{item.name}}<span>{{item.price | currency}}</span> </li> </ul> <div class="total"> Total: <span>{{total() | currency}}</span> </div> </form> </body></html> |
The novelty of this file is the div, which contains the total class . Within this tag we used the AngularJS expression to call the total() function . The filter I talked about earlier is also applied over this function.
We will create the total function that will calculate the total price:
PROBLEM 1 – Solution (part eight): JavaScript : script.js
|
1
2
3
4
5
6
7
8
9
10
11
|
$scope.total = function(){ var total = 0; angular.forEach($scope.items, function(s){ if (s.active){ total+= s.price; } }); return total;}; |
What’s new in this part of the code is the use of the angular.forEach() method
| Note: The angular.forEach() method serves to loop through a collection of data (usually a string). When it goes through the data collection, for each element it can call a defined function with which it will process it. |
This method accepts two parameters. The first parameter is the collection of data to pass and the second is a function. The function can accept the variable that will represent the date obtained through the current iteration. In our case, it must be checked if the item has been selected by the user, and if so, its price must be added to the total account. Finally, the function returns the result instead of the call.
Now our application is fully functional and we can see in the illustration the result display:
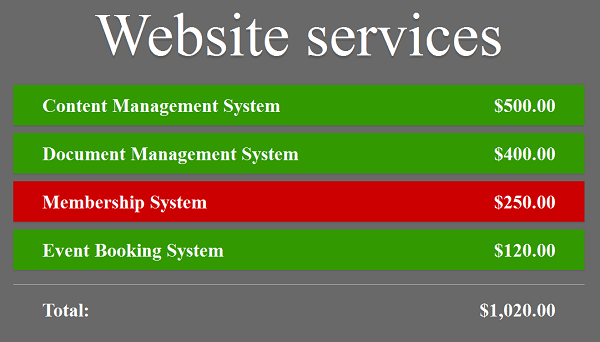
Image 15.4 AngularJS Website services – final layout
| Note: The entire code for this example can be found in the materials for this lesson. |
| Note: In accordance with the presented logic, complete the previous example so that the price including VAT (+ 20%) is calculated in front of the user. |
Creating the AngularJS filter
In the examples we went through in this lesson and the previous one we used some of the available AngularJS filters. Here is the table with some of the AngularJS filters that I didn’t use:
| Filter | Description |
| currency | Format the number in currency. |
| filter | Selects the substring of the element in a string. |
| lowercase | Format the string in lowercase. |
| orderBy | Sets the string to the given expression. |
| uppercase | Format the string in uppercase. |
Table 15.1. Part of the AngularJS filter
These are the predefined filters and their use is simple. However, the question arises whether we can create our own filter that has the behavior we set. This can be done, and we will now show an example of creating such a filter.
So, we will present the problem and through the solution we will present how it works in a practical example:
PROBLEM 2
Problem statement: Create an input field where the user can enter the phone model of interest. The phone must be searched in the data collection. If the phone exists, the full device name, image and description must be displayed. The user can enter only one character as sufficient search criteria. If the phone name has a sequence of characters entered in the input field, it must be displayed in real time.
First, we create the index.html file that will be the basis for our application:
PROBLEM 2 – Solution (part 1): HTML : index.html
|
1
2
3
4
5
6
7
8
9
10
11
12
13
14
15
16
17
18
19
20
|
<!DOCTYPE html><html><head> <link href="style.css" rel="stylesheet"/> <script src="https://ajax.googleapis.com/ajax/libs/angularjs/1.3.15/angular.min.js"></script> <script src="script.js"></script></head><body ng-app="searchApp" ng-controller="SearchController"><div class="bar"> <input type="text" ng-model="searchString"></div><ul> <li ng-repeat="item in items"> <img ng-src="{{item.image}}"> <h3>{{item.name}}</h3> <p>{{item.description}}</p> </li></ul></body></html> |
Through the directive, the module was defined on the entire body tag, and we called it: searchApp . I did the same with the searchString controller. I set the input field in the div tag which has the class bar . Since the input field, which is inside this div tag, is the model we’ll use for the filter, we set the ng-model directive . We named the pattern searchString because it is exactly the string we will be searching for.
To render all the elements in our collection, we’ll use the ng-repeat directive we’ve already discussed. Here we come to a new directive, called ng-src . This directive is used to set the scr attribute for the image. This exists because the browser can be “confused” when it doesn’t register the src attribute in the first place.
Now we also create the script.js file that we entered here:
PROBLEM 2 – Solution (part two): JavaScript : script.js
|
1
2
3
4
5
6
7
8
9
10
11
12
13
14
15
16
17
18
19
20
21
|
var searchApp = angular.module("searchApp", []);searchApp.controller("SearchController", function($scope){ $scope.items = [ { name: "Alcatel Idol 3", description: "IDOL 3 packs a powerful 3-in-1 experience, with great sound, Full HD display and industry-leading camera.", image: "alcatel_img.jpg" }, { name: "ZTE Blade 3", description: "The ZTE Blade III is a cheap Android Smartphone with a 1.0Ghz processor and an impressive 4-inch screen", image: "zte_img.jpg" }, { name: "Lenovo A5000", description: "The DUAL SIM Lenovo A5000 has a quick charge battery and energy-saving software.", image: "lenovo_img.jpg" } ]}); |
The syntax used is familiar, only the data is different, compared to the previous examples.
We also create the CSS styling for this example:
PROBLEM 2 – Solution (part three): JavaScript : script.css
|
1
2
3
4
5
6
7
8
9
10
11
12
13
14
15
16
17
18
19
20
21
22
23
24
25
26
27
28
29
30
31
32
33
34
35
36
37
38
39
40
41
42
43
|
*{ margin:0; padding:0;}body{ color: #5e5b64; text-align:center;}.bar{ border-radius: 2px; width: 400px; padding: 14px; margin: 80px auto 20px; position:relative;}.bar input{ width: 100%; height: 40px; font-size: 20px;}ul{ list-style: none; width: 428px; margin: 0 auto; text-align: left;}ul li{ border-bottom: 1px solid #ddd; padding: 10px; overflow: hidden;}ul li img{ width:60px; height:60px; float:left; border:none;}ul li p{ margin-left: 75px; font-weight: bold; padding-top: 12px; color:#6e7a7f;} |
Let’s see how our example looks now in the browser:

Image 15.5. Using AngularJS filters in search
We now set the filter for the search, based on the data entered by the user. First, we’ll change the index.html file:
PROBLEM 2 – Solution (fourth part): HTML : index.html
|
1
2
3
4
5
6
7
8
9
10
11
12
13
14
15
16
17
18
19
20
|
<!DOCTYPE html><html><head> <link href="style.css" rel="stylesheet"/> <script src="https://ajax.googleapis.com/ajax/libs/angularjs/1.3.15/angular.min.js"></script> <script src="script.js"></script></head><body ng-app="searchApp" ng-controller="SearchController"><div class="bar"> <input type="text" ng-model="searchString"></div><ul> <li ng-repeat="item in items | searchFor:searchString"> <img ng-src="{{item.image}}"> <h3>{{item.name}}</h3> <p>{{item.description}}</p> </li></ul></body></html> |
Notice that we have now defined a filter in the following line:
|
1
|
<li ng-repeat="item in items | searchFor:searchString"> |
Since this type of filter doesn’t exist, I gave it a name. After the colon, we define the date (from the previously created model) that we pass to the filter. We’ll now create the logic for this filter by adding some new code to the script.js file:
PROBLEM 2 – Solution (part five): JavaScript : script.js
|
1
2
3
4
5
6
7
8
9
10
11
12
13
14
15
16
17
18
|
searchApp.filter("searchFor", function(){ return function(arr, searchString){ if(!searchString){ return arr; } result = []; searchString = searchString.toLowerCase(); angular.forEach(arr, function(tel){ if(tel.name.toLowerCase().indexOf(searchString) !== -1){ result.push(tel); } }); return result; }}); |
Note the syntax. We use the AngularJS filter() method . This method accepts the filter name as a string and the function to call to operate the filter. It is important to note that this function always returns another function, so we set:
|
1
|
return function(arr, searchString){ |
This function accepts two parameters. The first parameter is a string to process (in our case, the entire items string ), while the second parameter is the string we passed to the filter. With these two data available, our filter will work without problems.
For optimization reasons, we can immediately check if the passed string is empty, and if so, immediately return the entire string. In other words, if the input field is empty, this means that all phones meet the criteria and must be displayed. If this scenario does not occur, it means that the user has made an entry in the input field. Therefore, the location where the results will be placed should be prepared. We will create a result string . To make the comparison easier, we’ll move the user input to lowercase. We will do the same thing later, and with the element in the string.
After this, we will use the forEach() method, which we explained earlier. As the syntax of this method is already known, we will only explain the use of the indexOf() method . This method returns -1 if there are no overlapping comparisons. Each time an overlap occurs, a new item is added to the result string .
At the end, the result value is returned .
Now our example works, and if we enter the number 3 in the input field, two phones with this character in their name will be displayed:
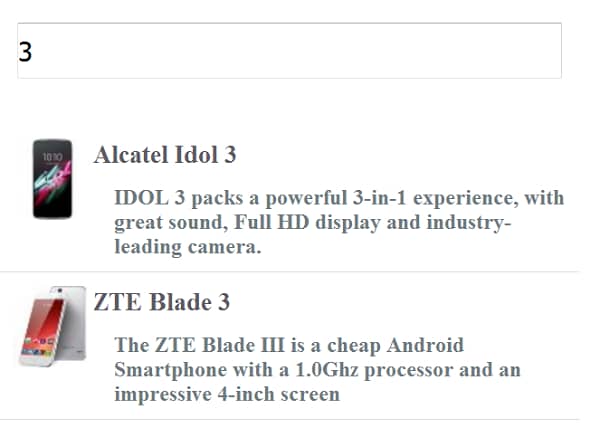
Image 15.6. Using AngularJS Filters in Search (2)
Ce permite directive of the class?