
Introduction to jQuery – Selectors
Unit: 8 of 19
In this lesson we will learn the basic concepts of the jQuery library, applied within a web page. jQuery is a complex library that was published in 2006. jQuery is a library that has JavaScript functionality implemented. These functionalities are executed in the browser on the client side. The basic idea of John Resig, the creator of the JQuery library, was to allow interaction with JavaScript elements using the CSS selector. This demonstrated a new idea that laid the foundation for the library as we know it today. From the moment it was published, jQuery quickly became very popular on the Internet. Since that time, jQuery has continued to develop, so that the first version was completed a few months after the library was published.
When the web came out there were no clear standards of JavaScript implementation. This resulted in browsers implementing JavaScript in different ways, which caused many problems for developers. As a consequence of such an implementation, programmers had to write JavaScript code for different web browsers. With the introduction of the jQuery library, this problem was solved to a large extent because there was a unique syntax that ensured the functionality of the code on all modern browsers.
To work with the jQuery library, basic knowledge of the DOM model is required . When the page is loaded, the web browser generates the content layout for that page. For each element of the given page, the browser generates one or more nodes, which represent the elements of the page. When working with JavaScript, the DOM can cause problems, but with the help of jQuery, this can be easily avoided.
We can think of jQuery as a bunch of JavaScript code bundled together. In order to use this library, it is necessary to load the content on the page in a certain way.
| Note:
Adding the jQuery library to the page can be done in two ways:
|
Download the jQuery library from the official jQuery.com website
To get started, download the jQuery file from the following web page: https://jquery.com/download/
We will see that on the jQuery download page, we can select different versions of the library itself and different formats (compressed, uncompressed, uncompressed). If you want to see well-formatted code, choose the uncompressed version, while in all other variants you will choose the compressed version (smaller file, deleted unnecessary comments, removed spaces and other “whitespaces” – unnecessary whitespaces for operation ). As for the version itself, to keep up with modern development, it is always good to choose the latest version.
The jQuery file itself will not be downloaded automatically, but a page with a certain code will open in the browser. You must right-click to save the code to the location from which you will use the library.
Image 8.1. Example of jQuery library download, regardless of version and type:
When you save, you can rename the jQuery file to jquery.min.js for easier future use. After downloading the library, a page must be created on which this library will be used.
Example 1: JavaScript
|
1
2
3
4
5
6
7
8
9
10
11
12
13
14
|
<html><head> <title>jQuery</title> <script src="jQuery-2.1.4.min.js"></script></head><body><p>This is my text</p><script> var data=$("p").text(); alert(data);</script></body></html> |
To be able to use the jQuery library on the page, we need to run the implementation:
|
1
|
<script src="jquery.min.js"></script> |
The code we set in the script tags , in the body part of the page, will serve as a success test for the implementation of the jQuery library. If the library is implemented successfully, after starting the page, the browser will display an alert box with the following message: “This is my text”.
| Note:
If your code does not work, i.e. if the alert window does not appear after starting the page, check:
|
In this example we download the textual value of the element that has the p tag. The $ symbol represents the sign that is used in the jQuery library, which we will talk more about in the second part of the lesson. We use the t ext() method to download the values, and then the variable where we store this value is passed to the alert() method and we receive the following notification on the monitor:
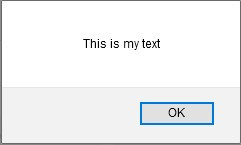
Image 8.2. jQuery alert window
Adding the jQuery library using CDN
The way described above assumes that you have the jQuery library on your own file system and deploy it on every page from there. However, there is a possibility that this library may also be transposed from an external source, i.e. from a location that is outside your server . There are many CDNs that store the jQuery library, including Google and Microsoft.
At the address:
https://developers.google.com/speed/libraries/devguide
you can find different libraries, including jQuery:
If you decide exactly for this way of implementation, it is not necessary to download the jQuery library, it is enough to copy the prepared script tag to your html page. And here we will have to choose the version we want to use, i.e. the latest version.
Let’s look at the previous example where the jQuery library was implemented in the following way:
Example 2: JavaScript
|
1
2
3
4
5
6
7
8
9
10
11
12
13
14
|
<html><head> <title>jQuery</title> <script src="https://ajax.googleapis.com/ajax/libs/jquery/x.x.x/jquery.min.js"></script></head><body><p>This is my text</p><script> var data=$("p").text(); alert(data);</script></body></html> |
| Note:
Pay attention to the xxx part of the src attribute and the part after /jquery/: this must be replaced with the current version of the jQuery library. |
jQuery Syntax – Selectors
The jQuery library was created to make good use of selectors and actions on the selected element. In this part of the lesson we will primarily deal with the selection of elements, it is important to note that jQuery uses the same logic as CSS. This is a boon for new users familiar with CSS. As selectors are used to locate the element or elements on the page, it is clear that there must also be a search criteria. These criteria can be different: id, class, attribute, element name, etc.
Selection based on element name
Selectors in the jQuery library are enclosed in parentheses after the $ symbol: $()..
| Note:
The basic structure of jQuery is: $(selector).action() where the $ sign is used to define or access the jQuery library. Instead of the $ sign, we can also use the jQuery variant: jQuery(selector).action() Both options give the same result.
|
The tag name can be specified between quotes and all tags of the specified name will be selected. If you remember the querySelector() method, you will find that this method returns only the first element of the named name. Unlike this method, if we use the selection based on the name of the element in the jQuery library, we will get selected all the elements whose tag name matches.
Let’s see this in an example:
Example 3: JavaScript
|
1
2
3
4
5
6
7
8
9
10
11
12
13
14
15
16
17
|
<html><head> <title>jQuery</title> <scriptsrc="https://ajax.googleapis.com/ajax/libs/jquery/x.x.x/jquery.min.js"> </script></head><body><p>This is my text</p><p>This is my text</p><p>This is my text</p><script> var data=$("p").text("New text!");</script></body></html> |
Selecting the element based on the ID attribute
Searching for the element based on the id attribute is the most used way of selection. It should be noted that there must be only one element on the page with the specified id attribute value , since the purpose of the id is to be a unique identifier.
Let’s see this in the example:
Example 4: JavaScript
|
1
2
3
4
5
6
7
8
9
10
11
12
13
14
15
16
17
|
<html><head> <title>jQuery</title> <script src="https://ajax.googleapis.com/ajax/libs/jquery/x.x.x/jquery.min.js"> </script></head><body><p>This is my text</p><p id="id_1">This is my text</p><p>This is my text</p><script> var data=$("#id_1").text("New text!");</script></body></html> |
Selection by class attribute
Since it makes sense that multiple elements can have the same value for the class attribute , so the actions taken after this selector will refer to all of them. The application is very similar to selecting by the id attribute, and the name prefix is the dot symbol in this case (.).
Example 5: JavaScript
|
1
2
3
4
5
6
7
8
9
10
11
12
13
14
15
16
17
|
<html><head> <title>jQuery</title> <script src="https://ajax.googleapis.com/ajax/libs/jquery/x.x.x/jquery.min.js"> </script></head><body><p class="myClass1">This is my text</p><p class="myClass1">This is my text</p><p>This is my text</p><script> var data=$(".myClass1").text("New text!");</script></body></html> |
Using the CSS selector attribute
As in the case of working with CSS, here too we can use specific attribute selectors to more precisely select the desired element. Here we will go through some examples where we will show how such selectors can be used within the jQuery library.
Example 6: JavaScript
|
1
2
3
4
5
6
7
8
9
10
11
12
13
14
15
16
17
|
<html><head> <title>jQuery</title> <script src="https://ajax.googleapis.com/ajax/libs/jquery/x.x.x/jquery.min.js"> </script></head><body><h1 class="myClass1">This is my text</h1><p class="myClass1">This is my text</p><p>This is my text</p><script> var data=$("p.myClass1").text("New text!");</script></body></html> |
After running this code, we notice that only the tag p belonging to the class myClass1 has been modified , while h1 has remained unchanged.
After the tag sign we can set the colon symbol (:), after which we can write one of the keywords for the precise definition of the element in the DOM structure. For example, if we want to select the first element of the defined tag, after specifying it we can set the word first .
Let’s see this in an example:
Example 7: JavaScript
|
1
2
3
4
5
6
7
8
9
10
11
12
13
14
15
16
17
18
19
20
|
<html><head> <title>jQuery</title> <script src="https://ajax.googleapis.com/ajax/libs/jquery/x.x.x/jquery.min.js"> </script></head><body><div id="id1"> <h1>This is my text 1</h1> <h1>This is my text 2</h1> <h1>This is my text 3</h1> <p>This is my text p</p> <p>This is my text p</p></div><script> var data=$("h1:first").text("New text!");</script></body></html> |
The result on the page is the modification of the first h1 tag.
So far we have discussed the selection according to frequently used attributes, which are practically left to the selection of the elements (id, class). However, we are not limited to selecting elements only by these attributes. For example, we can select all the elements that have the attribute defined for the event operation (for example: onclick). When we want to do something similar, we specify the attribute in square brackets.
Let’s see this in an example:
Example 8: JavaScript
|
1
2
3
4
5
6
7
8
9
10
11
12
13
14
15
16
17
18
19
20
|
<html><head> <title>jQuery</title> <script src="https://ajax.googleapis.com/ajax/libs/jquery/x.x.x/jquery.min.js"> </script></head><body><div id="id1"> <h1>This is my text 1</h1> <h1 onclick="alert('text')">This is my text 2</h1> <h1>This is my text 3</h1> <p onclick="alert('text')">This is my text p</p> <p>This is my text p</p></div><script> var data=$("[onclick]").css("color", "red");</script></body></html> |
The result on the page is as follows:
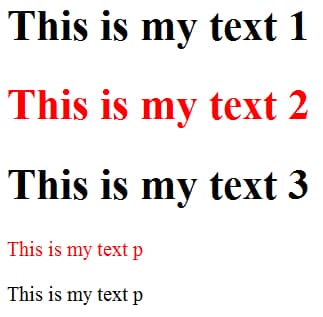
Imaginea 8.3. jQuery CSS
We notice that the css() method is applied to all elements that have the onclick attribute. Recall that the css() method can accept:
- a parameter in the form of the attribute name when returning the value of that attribute;
- two parameters (as in our example), where the first parameter represents the name of the attribute, and the second the value;
- the object, where the keys represent the names of the attributes, and the values for the keys are precisely the values of the objects.
The selection can gain even greater power if we check the match with the defined value.
Let’s see the example where we select all the tags that have the onclick attribute , and also call the function function1() (tags that with a click call another function will not be selected):
Example 9: JavaScript
|
1
2
3
4
5
6
7
8
9
10
11
12
13
14
15
16
17
18
19
20
|
<html><head> <title>jQuery</title> <script src="https://ajax.googleapis.com/ajax/libs/jquery/x.x.x/jquery.min.js"> </script></head><body><div id="id1"> <h1>This is my text 1</h1> <h1 onclick="function1()">This is my text 2</h1> <h1>This is my text 3</h1> <p onclick="function2()">This is my text 4</p> <p onclick="function1()">This is my text 5</p></div><script> var data=$("[onclick = 'function1()']").css("color", "red");</script></body></html> |
The result on the page is as follows:
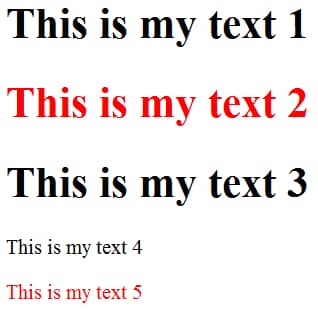
Imaginea 8.4. jQuery CSS 2
Given the fact that there are many jQuery selectors, we will not comment on each one individually, but we will present the table with some of the most commonly used selectors that we have not mentioned so far.
You can find the list of other selectors at the following address:
https://api.jquery.com/category/selectors/
Table of frequently used selectors:
| Selector | Example | Description |
| * | $(“*”) | Select all items. |
| :even | $(“tr:even”) | Select elements equal to <tr>. |
| :odd | $(“tr:odd”) | Select odd <tr> elements. |
| :first-of-type | $(“p:nth-of-type(2)”) | Selects all <p> elements that are the second <p> element of its parent. |
| :eq(index) | $(“ul li:eq(3)”) | Select the fourth <li> tag within the <ul> tag. |
| :not(selector) | $(“input:not(:empty)”) | Selects all non-empty input elements. |
| :empty | $(“:empty”) | Selects all items that are empty. |
Table 8.1 Frequently used selectors
jQuery filtering
We will also mention some of the most frequently used filtering methods, namely: first(), last() and eq(). These methods base their selection on the element’s position in the string.
On one of the previous examples we will demonstrate the operation of the first() method:
Example 10: JavaScript
|
1
2
3
4
5
6
7
8
9
10
11
12
13
14
15
16
17
18
19
20
|
<html><head> <title>jQuery</title> <script src="https://ajax.googleapis.com/ajax/libs/jquery/x.x.x/jquery.min.js"> </script></head><body><div id="id1"> <h1>This is my text 1</h1> <h1 onclick="function1()">This is my text 2</h1> <h1>This is my text 3</h1> <p onclick="function2()">This is my text 4</p> <p onclick="function1()">This is my text 5</p></div><script> var data=$("[onclick = 'function1()']").first().css("color", "red");</script></body></html> |
If we start this code, we will notice that only the first element is selected that with a click calls the function function1(). Here, jQuery’s ability to add methods to the execution chain is also demonstrated.
Also, the other selection methods based on position work on the same principle, so they will not be commented on further.
Find the documentation for the other methods at the following address:
http://api.jquery.com/category/traversing/
The syntax for selectors in the jQuery library is based on the syntax used by:
PROBLEM 1
Problem Statement: Look at the structure of the following document and define the selector to provide the element whose content is “TARGET”:
|
1
2
3
4
5
6
7
8
9
10
11
12
13
14
15
16
17
18
19
|
<html><head> <title>jQuery</title> <script src="https://ajax.googleapis.com/ajax/libs/jquery/x.x.x/jquery.min.js"> </script></head><body><div id="id1"> <h1>This is my text 1</h1> <h2 onclick="function1()">This is my text 2</h2> <h3>This is my text 3</h3> <p>This is my text 4</p> <p>TARGET</p> <p></p> <h3>This is my text 6</h3></div></body></html> |
PROBLEM 1 – Solution: JavaScript
|
1
2
|
//p:nth-of-type(2)var data=$("p:nth-of-type(2)").css("color", "red"); |
| PROBLEM 8.1
Problem statement: Look at the structure of the following document and, based on the previous example and the acquired knowledge, define the selector with the help of which you will receive the element whose content is “TARGET”:
If you are unclear, the solution to the exercise can be downloaded from the course. |