
PHP and databases
Unit: 19 of 19
In this lesson you will have the opportunity to learn with what bases and in what ways you can work in the PHP language.
PHP and ODBC
PHP provides support for Open Database Connectivity (ODBC). In this way, the PHP program can access any ODBC- supported database , such as Oracle, DB2, MS SQL Server , or MS Access . PHP provides the methods by which the base can be accessed depending on its DSN , but it can also perform the so-called DSN-less connections . This second aspect of the connection is used in cases where there is no DSN or when it is unknown. For example, in the case of the MS Access database.
The most frequently used functions for the ODBC connection are:
- odbc_connect(dsn/dsn-less connection string, username, password) – the function used to establish the connection with the base. This function has three arguments, the first of which is the DSN base or DSN-less string, this argument being required. The other two arguments are username and password. If there is no need to send them to the base, just the empty string can be sent. After the connection is established, this function returns the connection identification number that other ODBC functions use.
- odbc_exec(connection_id, SQL query_string) – this function is used to execute the SQL command . On error, the function returns FALSE. If the SQL command executed successfully, the function returns the set of syllables that satisfy the query.
- odbc_fetch_array(recordset name) – used to store the set of syllables in the associative string.
- odbc_num_rows(recordset name) – returns the number of syllables that are in the result set. On error, it returns -1. For INSERT, UPDATE, or DELETE commands, this function returns the number of syllables changed by those commands. In the case of the SELECT command, this function returns the number of selected syllables.
- odbc_close(connection_id) – closes the connection.
PHP and MySQL
The most widely used database on the internet is certainly MySQL. This base format quickly became widely used, at least when we talk about Internet applications, due to its speed, reliability and ease of use. PHP provides support for MySQL databases with a number of classes and functions that can be used to manipulate data.
In PHP, the database can be manipulated in several ways. The most common way is to use mysqli and PDO.
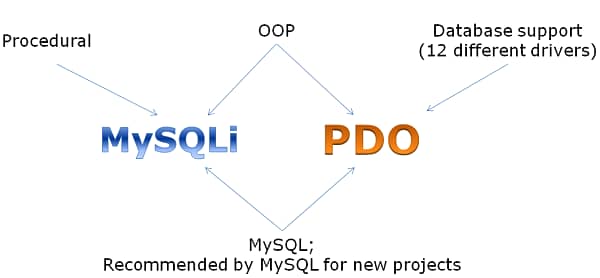
| NoteStarting with PHP version 5.5.0, the mysql extension is deprecated and its use is no longer recommended. The heir of this extension is the advanced mysqli extension, whose use is acceptable and which can be used both objectwise and procedurally. Apart from this extension, you can also use the PDO extension, which will be covered in the following courses, but which only supports object access. The illustration below shows the relationship between the mysqli extension and PDO:
Image 19.1. MySQLi vs PDO
So procedural access only allows mysqli, so it can work exclusively with MySQL. On the other hand, PDO can work with more (12), so it does not provide procedural access. Both extensions are very useful in OOP and support MySQL. |
In the php mysqli library, all database manipulation can be performed procedurally or object-wise.
Below, we provide a list of some of the most important functions of the mysqli extension:
- mysqli_connect ( MySQL server name, username, password, dbname ) – opens the connection to the MySQL server and selects the database;
- mysqli_query ( connection, sql query ) – sends the currently active database query;
- mysqli_fetch_array(recordset ) – returns a string corresponding to the set of resulting syllables;
- mysql_num_rows ( recordset id ) – determines the number of rows that appear in the resulting data set, which is obtained after executing the SELECT command;
- mysqli_affected_rows ( connection ) – determines the number of rows modified by previously executed commands, INSERT, DELETE or UPDATE;
- mysqli_close ( connection ) – close the connection.
Data creation
All changes and lookups of data in the database are done with the help of the appropriate SQL commands, which are passed to the database.
Next, we will send two commands to the MySQL server. One for database creation and another for table creation. The result will be a data base or table.
The first step is, of course, to create the connection. We do this with the mysqli_connect function. E.g:
|
1
|
$conn = mysqli_connect("localhost","root",""); |
Here, we must mention that it is possible, simultaneously, to execute and maintain the connection to several databases. This means that not all the data, necessary for the operation of the application, must be located on a database server, but that at the same time it could communicate with several servers of this type. The graphic representation of this function and the connection to different bases could be illustrated as follows:
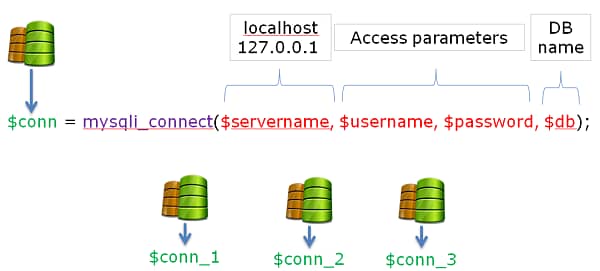
Image 19.2. mysqli connect
The second step is to run the query. The query must create the database, and as a result, the entire line will look like this:
|
1
|
mysqli_query($conn,"CREATE DATABASE first_php_test_db"); |
Next, with the help of the SQL query we will make a table in the database, and its creation will be very similar to the table in the previous line:
|
1
2
|
mysqli_select_db($conn,"first_php_test_db");mysqli_query($conn,"CREATE TABLE mytable (id int primary key auto_increment, username varchar(50))"); |
Then, also with the help of the query and the mysqli_query function, we insert data into the table. There will be three names: Peter, Sally and John.
|
1
|
mysqli_query($conn,"INSERT INTO mytable values(null,'Peter'),(null,'Sally'),(null,'John')"); |
Finally, we’ll close the database connection using the mysqli_close function:
|
1
|
mysqli_close($conn); |
After executing the code, the database will be created on the server. Next is the complete code (remember to comment out all the database and table creation lines after execution, so that they don’t run each time again and try to create objects that already exist in the database):
|
1
2
3
4
5
6
|
$conn = mysqli_connect("localhost","root","");mysqli_query($conn,"CREATE DATABASE first_php_test_db"); mysqli_select_db($conn,"first_php_test_db");mysqli_query($conn,"CREATE TABLE mytable (id int primary key auto_increment, username varchar(50))"); mysqli_query($conn,"INSERT INTO mytable values(null,'Peter'),(null,'Sally'),(null,'John')"); mysqli_close($conn); |
Data selection and modification
Displaying data from the database is done using the SELECT query. With this query we determine what data and in what way we want to display it. For example, we want to retrieve the data we entered earlier. We will send the following SQL query to the MySQL server:
|
1
|
SELECT * FROM mytable |
This query will display the contents of the table in tabular form and we can retrieve it using php functions.
It should be emphasized here that an asterisk in the query means that the values of all columns will be selected. Instead of an asterisk, column names can also be specified here, separated by commas. For example, if we wanted to select only the username column value, we would write:
|
1
|
SELECT username FROM mytable |
We already know that the php function to start the SQL query is mysqli_query, so the first line of code could be:
|
1
|
$result = mysqli_query($conn,"SELECT * FROM mytable"); |
This line will return the query result and store it in the $result variable. This variable will contain the resource that we can pass through in different ways. One of the most commonly used ways is through the fetch function. The fetch function returns the current row and positions itself on the next one, and on this occasion the row can be returned as an indexed string, associative string, or as an object. It is even possible to return a result as a concatenated associative string or as an indexed string. In case there are no more rows, this function will return null, which can also be interpreted as false, based on which we could build the following code, which will display all users in the table:
|
1
2
|
while($rw=mysqli_fetch_row($result)) echo "ID: " . $rw[0] . " - Name: " . $rw[1] . "<br />"; |
This should be the output:
ID: 1 – Name: Peter
ID: 2 – Name: Sally
ID: 3 – Name: John
In practice, the use of the database is much more complex and also involves the use of form data, although, in the background, the whole concept will be based on the rules mentioned above.
The following example represents a company page with an employee data search form.
Note: The example contains several raw sections and requires the existence of a corresponding database, as such, this example does not need to be tested, as we will only analyze its structure.
index.php
|
1
2
3
4
5
6
7
8
9
10
11
12
13
14
15
16
17
18
19
20
21
22
23
24
25
26
27
28
29
30
31
32
33
34
35
36
37
38
39
40
|
<?php if (isset($_POST['searchName']) && !empty($_POST['searchName'])) { $string = $_POST[ 'searchName' ]; $conn = mysqli_connect('localhost', 'root', ''); $db = mysqli_select_db($conn, 'membership'); $sql = "SELECT * FROM directory WHERE LName = '$string'"; $rs = mysqli_query($conn, $sql); if (mysqli_num_rows($rs) == 0){ echo "No records found!"; }else{ while($row = mysqli_fetch_array($rs)) { echo "Nume: " .$row['FName'] . " "; echo $row['LName'] . "<br/>"; echo "Tel: " . $row['Tel'] . "<br/>"; echo "E-mail: " . $row['email'] . "<br/>"; } } mysqli_close($conn);}?><!DOCTYPE html><head><title> A Web Page </title></head><body><form action = "index.php" method = "post"> <p>Enter the last name of the employee and click the "Search"</p><table> <tr> <td colspan = "2"> Company XYZ Directory </td> </tr> <td><input type = "text" size = "15" name = "searchName"/></td> <td><input type = "submit" value = "Search"/> </tr></table></form></body></html> |
After entering the name in the Input field and clicking on the Search button, the database data search is performed. If the search result exists, the employee data will be listed. On the other hand, if there is no overlap between the input from the user and the data from the database, the following message will be issued: “No records found!”.
Analyzing this code, we can see that it can be segmented into two large blocks, namely: the PHP block and the HTML block.
We’ll look at the HTML block first:
|
1
2
3
4
5
6
7
8
9
10
11
12
13
14
15
16
17
18
|
<!DOCTYPE html><head><title> A Web Page </title></head><body><form action = "index.php" method = "POST"> <p>Enter the last name of the employee and click the "Search"</p><table> <tr> <td colspan = "2"> Company XYZ Directory </td> </tr> <td><input type = "text" size = "15" name = "searchName"/></td> <td><input type = "submit" value = "Search"/> </tr></table></form></body></html> |
We see that it is a simple HTML code and that its parts do not need to be analyzed separately, but we will still comment on the form. The form will use the POST method to be able to pass parameters to the server. With the action attribute, the call to the index.php file (respectively the currently used file) is defined. The Input field, in which the user must perform the insertion, as the value of the name attribute has: “searchName”, based on which we will identify it later through the PHP code.
Now we can also analyze the PHP code part:
|
1
2
3
4
5
6
7
8
9
10
11
12
13
14
15
16
17
18
19
20
21
|
<?php if (isset($_POST['searchName']) && !empty($_POST['searchName'])) { $string = $_POST[ 'searchName' ]; $conn = mysqli_connect('localhost', 'root', ''); $db = mysqli_select_db($conn, 'membership'); $sql = "SELECT * FROM directory WHERE LName = '$string'"; $rs = mysqli_query($conn, $sql); if (mysqli_num_rows($rs) == 0){ echo "No records found!"; }else{ while($row = mysqli_fetch_array($rs)) { echo "Nume: " .$row['FName'] . " "; echo $row['LName'] . "<br/>"; echo "Tel: " . $row['Tel'] . "<br/>"; echo "E-mail: " . $row['email'] . "<br/>"; } } mysqli_close($conn);}?> |
When we first open the index.php page, there is no need to execute the PHP code because the user has not yet entered anything into the Input field. Therefore, the conditional execution must be put here, and the PHP code must be executed only if the Post searchName parameter is passed and if it is not an empty parameter (which can be the consequence of clicking on the Search button without inserting the parameters in the Input field). Such a check is performed using the following line of code:
|
1
|
if (isset($_POST['searchName']) && !empty($_POST['searchName'])) { |
In the $string variable, we put the value of the passed parameter.
Now, we can establish the connection to the database like this:
|
1
|
$conn = mysqli_connect('localhost', 'root', ''); |
After the connection, we select the desired database:
|
1
|
$db = mysqli_select_db($conn, 'membership'); |
Since our connection is ready, we can also prepare the SQL query:
|
1
|
$sql = "SELECT * FROM Directory WHERE LName = '$string'"; |
To create the query, I used the SQL syntax and the already prepared $string variable.
| Note:
This example is given for practice only. In production, such a query would have been very risky from a security point of view, so we would have had to use some security concepts as well. |
Since everything is now ready to indicate the query to the base, we do this in the following way:
|
1
|
$rs = mysqli_query($conn, $sql); |
We need to check if there is any search result, and according to the obtained result, we direct our application to the following execution steps:
|
1
|
if (mysqli_num_rows($rs) == 0){ |
If there is no search result, the user must be informed of this status by issuing:
|
1
|
echo "No records found!"; |
On the other hand, if we still have search results, we go through each result and display it on the page:
|
1
2
3
4
5
6
|
while($row = mysqli_fetch_array($rs)) { echo "Nume: " .$row['FName'] . " "; echo $row['LName'] . "<br/>"; echo "Tel: " . $row['Tel'] . "<br/>"; echo "E-mail: " . $row['email'] . "<br/>"; } |
At the end of the whole process, we can close the connection:
|
1
|
mysqli_close($conn); |
Deleting, adding or modifying a row is done in a similar way. In this case, the corresponding SQL commands are used: DELETE, INSERT and UPDATE.
Types and levels of authorization in working with MySQL
Although in this course we only deal with the basic combinations of using PHP and MySQL, you need to know what exactly and to what extent you are allowed to use, so that you do not end up in the situation where an error leads you to the wrong solution. We recommend that you know your permissions when using the database so that you know how to apply the functions correctly. In MySQL, there are three main types of users:
- Simple users;
- Administrators;
- Some special permissions.
Here, we only see permissions for simple users:
| Authorization | It is attributed for | Description |
| SELECT | Tables, columns | Allows users to read rows from the table. |
| INSERT | Tables, columns | Allows users to enter new rows. |
| UPDATE | Tables, columns | Allows users to modify values in existing table rows. |
| DELETE | Tables | Allows users to delete existing rows. |
| TRUNCATE | Tables | Allows users to delete all rows. |
| INDEX | Tables | Allows users to index specific tables. |
| ALTER | Tables | Allows users to modify the structure of existing tables, such as adding columns, changing column names, tables, or data types in the table. |
| CREATE | Databases, tables | Allows users to create new databases and tables. If a specific database or table is entered in the GRANT command, users can only create that database or table with the CREATE command, which means that if it exists, they must first drop it with the DROP command. |
| DROP | Databases, tables | Allows users to delete databases and tables. |
Table 19.1.
Exercise 1
Problem: With the help of PHP MySQL create the test_db databaseand in it the users table , which will contain three fields: id, username and password.
Solution:
|
1
2
3
4
5
6
7
|
<?php $conn = mysqli_connect( "localhost", "root", "" );mysqli_query( $conn, "CREATE DATABASE test_db" );mysqli_select_db( $conn, "test_db" );mysqli_query($conn, "CREATE TABLE users (userid int primary key auto_increment, username varchar(256), password varchar(256))");mysqli_close( $conn );?> |
The purpose of this example is to present the possibilities that the mysqli functions have, but in combination with them the SQL syntax is used, which we will discuss more in the MySQL programming and administration course.
First of all, we create the connection using the mysqli_connect function, to which we assign host, name and password. Then we do the query with which we create a new database:
|
1
|
mysqli_query( $conn, "CREATE DATABASE test_db" ); |
Then, we immediately make the selection of this base (we could not do this during the connection, because the base did not exist at that time):
|
1
|
mysqli_select_db( $conn, "test_db" ); |
To create the table, in this database we run the following query:
|
1
|
mysqli_query($conn, "CREATE TABLE users (userid int primary key auto_increment, username varchar(256), password varchar(256))"); |
The CREATE TABLE command is used to create a new table in the base. Immediately after this command, we define the desired name of the table. The table can have several columns. The definition of each column is separated by a comma. The first column is called userid , the data type is int (integer) and this column presents the primary key . Also, considering that we want the value of this column to have unique records, we also set the automatic increment auto_increment. The next column is called username, and the data type is varchar. Between the brackets we define the number that represents the maximum number of characters that can be entered here. We do the same for the last column, password.
After that we close the connection with the base.
Exercise 2
Problem:
The following string is given:
|
1
|
$users = array(array("peter", "123"), array("john", "456"), array("thomas", "789")); |
Insert the users from the string into the test_db database , the users table , so that the first member of each substring is the username field and the second is password.
Solution, option 1:
|
1
2
3
4
5
6
7
8
9
|
<?php$conn = mysqli_connect("localhost", "root", "");mysqli_select_db($conn,"test_db");$users = array(array("Peter", "123"), array("John", "456"), array("Thomas", "789"));foreach($users as $user){ mysqli_query($conn,"INSERT INTO users (username, password) VALUES ('{$user[0]}', '{$user[1]}')");}mysqli_close($conn);?> |
Solution, option 2:
|
1
2
3
4
5
6
7
8
9
10
11
12
13
14
|
<?php$conn = mysqli_connect("localhost", "root", "");mysqli_select_db($conn,"test_db");$users = array(array("Peter", "123"), array("John", "456"), array("Thomas", "789"));$usersForQuery = "";foreach($users as $user){ $usersForQuery.="('{$user[0]}', '{$user[1]}'),";}if(substr( $usersForQuery, strlen($usersForQuery) - 1) == ","){ $usersForQuery = substr($usersForQuery,0,strlen($usersForQuery)-1); } mysqli_query($conn,"insert into users (username, password) values $usersForQuery");mysqli_close($conn);?> |
This theme can be solved in several ways. First of all, in the first variant we make the connection with the database and prepare the data string that will be entered into the database:
|
1
2
3
|
$conn = mysqli_connect("localhost", "root", "");mysqli_select_db($conn,"test_db");$users = array(array("Peter", "123"), array("John", "456"), array("Thomas", "789")); |
To go through each element of the string, we use the foreach loop , where in each iteration we execute a query to the base.
|
1
|
mysqli_query($conn,"INSERT INTO users (username, password) VALUES ('{$user[0]}', '{$user[1]}')"); |
With the INSERT INTO command, data is inserted into the database. The columns in which they will be inserted can be defined in round brackets. After this part follows the VALUES command, then the values that will be entered in the table are defined between brackets.
Finally, we can close the connection to the base:
|
1
|
mysqli_close($conn); |
The second way assumes the same type, only that the string that represents the part of the query with the contents of the variables is prepared earlier using the foreach loop and flow control and put in the variable: $usersForQuery .
Exercise 3
Problem:
It is necessary to validate users from the database, based on the username and password contained in the variables.
Solution:
|
1
2
3
4
5
6
7
8
9
10
11
12
13
|
<?php$username = "John";$password = "456";$conn = mysqli_connect("localhost", "root", "");mysqli_select_db($conn,"test_db");$r = mysqli_query($conn,"SELECT * FROM users WHERE username = '$username' AND password = '$password'");if(mysqli_num_rows($r) == 1) echo "valid";else echo "invalid";mysqli_close($conn);?> |
| Note: This solution is totally insecure because it is very easy to perform sql injection on it and get a positive result at any time. |
That is why it is mandatory to perform the best possible input validation. In this case, the following two lines are sufficient to secure the system from the mentioned attack:
|
1
2
|
$username = mysqli_real_escape_string($conn, $username);$password = mysqli_real_escape_string($conn, $password); |
After creating the variables, the connection and selecting the database, the following query is executed:
|
1
|
SELECT * FROM users WHERE username = '$username' AND password = '$password' |
The result of this query is put in the variable $r. Analyzing the query, we notice that after the WHERE command follows the conditioning of the selection, respectively it is sought that the username field (AND) and the password field correspond to the values found in the prepared variables.
After the query, as we know, the results are checked and the messages are written:
|
1
2
3
4
|
if(mysqli_num_rows($r) == 1) echo "valid";else echo "invalid"; |
Finally, the connection is closed:
|
1
|
mysqli_close($conn); |
Exercise 4
Problem:
All fields in the test_db database, users table, whose password is three characters long, must have the three characters of the existing password appended to them (if the password is abc, the new password must be abcabc).
Solution:
|
1
2
3
4
5
6
7
8
9
|
<?php$conn = mysqli_connect("localhost", "root", "");mysqli_select_db($conn,"test_db");$r = mysqli_query($conn,"SELECT * FROM users");while($row = mysqli_fetch_array($r)){ mysqli_query($conn,"UPDATE users SET password = concat(password,password) WHERE length (password) = 3");}mysqli_close($conn);?> |
This example has the already known syntax, but also the lenght and concat functions, which need to be explained. The length function counts the characters in the field it refers to. The concat function concatenates the record in the field. Since we need the concatenation of password with itself, as well as the parameters of the function, we define password twice, separated by a comma.
Exercise 5
Problem:
The function must be created which based on the query returns the two-dimensional string from the base.
Test the function created in the users table .
Solution:
|
1
2
3
4
5
6
7
8
9
10
11
12
13
14
|
<?phpfunction arrayFromDB($query){ $conn = mysqli_connect("localhost", "root", ""); mysqli_select_db($conn,"test_db"); $r = mysqli_query($conn,$query); $resArray = array(); while($tmpArr = mysqli_fetch_row($r)) $resArray[] = $tmpArr; return $resArray;}$users = arrayFromDB("SELECT * FROM users");foreach($users as $user) echo "id: " . $user[0] . ", name: " . $user[1] . ", password: " . $user[2] . "<br>"; |
We will use the arrayFromDB function to execute the database query, based on the assigned parameter. Instead of the call, the function returns the two-dimensional string with the results. Within the function, the connection is made with the base and we execute the query. We create the array $resArray, which will contain results as background. By passing through the while loop, we retrieve row by row and put the query in the previously prepared string. After the function executes all iterations, it returns the prepared string.
Exercise 6
The function must be created that, based on the query passed as a parameter, returns the numeric value that represents the number of rows after the query.
The function must be tested in the users table.
Solution:
|
1
2
3
4
5
6
7
8
9
10
11
12
13
14
15
16
|
<?phpfunction scalar($query){ $conn = mysqli_connect("localhost", "root", ""); mysqli_select_db($conn,"test_db"); $r = mysqli_query($conn,$query); if(mysqli_num_rows($r) == 1) { $value = mysqli_fetch_row($r); return (int)$value[0]; } else return "";}echo scalar("select count(userid) from users");?> |
We will use the scalar() function to send the query to the base, after which we will check the returned numerical value. On the last line of code is the function call:
|
1
|
echo scalar("select count(userid) from users"); |
Here we use the count() function, which counts the rows in the table.
Within the function, we establish the connection with the base and perform the query:
|
1
2
3
|
$conn = mysqli_connect("localhost", "root", "");mysqli_select_db($conn,"test_db");$r = mysqli_query($conn,$query); |
Then, we check the returned result and convert the date to an integer, which we return from the function:
|
1
2
|
$value = mysqli_fetch_row($r);return (int)$value[0]; |
If there are no results, we return an empty string:
|
1
|
return ""; |