
Backup and migration
Unit: 24 out of 24
Whether you need to define a system that will create backup copies of your data (backup) or if you simply need to migrate your entire database to another server, you must use one of the techniques described later in this lessons.
Migration is a slightly more complex notion than the simple notion of backup, but the two can also coincide. When we migrate, we usually have to migrate the entire SQL structure, that is, all the objects on the server and, of course, all the data.
Backup can also be performed for data, which is the main interest of this backup process, but also for the underlying structure itself.
The backup strategy in a system depends on the structure of that system. Some systems require frequent backups with minimal data loss; others don’t require backups as often, and some don’t need backups at all.
These three characteristics can be easily illustrated by real examples. A bank where a lot of transactions take place every day must have a solid and safe base, with a safe and efficient backup system that backs up data very frequently. A historical archive, on the other hand, does not require such a frequent backup system. Here, the data rarely changes, and updating the backup can be done much less often than in the case of the bank. The entry database will be current until the end of the event. After that, neither base nor backup will be needed (except for an archive).
In addition to the structure and purpose of the database, the way we will backup the MySQL database also depends on our ability to access this database, respectively the computer on which it is located.
In the continuation of the lesson, we will familiarize ourselves with different backup and migration techniques.
Copying files
The easiest and fastest way to backup and migrate is to manually copy all files from the database. For this, we need to access the data folder of the MySQL server, find the folder with the desired base (it is called the same as the base itself) and copy it.
Apart from the fact that we have to do it manually, this way of backing up has two other important negative aspects. First, we can only do it if we have access to the computer’s file system, and second, only if the database does not contain tables in the InnoDB storage system. We know that the InnoDB database data is in the common file folder (ibdata1), which means that this file also contains data from other databases.
If the base is frequent, it is best that, before copying the files, we disable the introduction of new data, so as not to lose the data that is entered during the backup execution. One way to do this is by using the lock command :
|
1
|
FLUSH TABLES WITH READ LOCK |
This command is actually made up of two commands (lock and flush). When we tell the server to flush tables , we are telling it to close all the tables and stop the current inserts into them. The read lock command (which is, in fact, a variation of the command lock table myTable read ) prohibits entries in the table.
Regarding the data return, we don’t have to say anything more, considering that it is a simple data copy. Data is simply copied from one location to another.
Dump tables in text files
Database tables can be exported to a text file, of course, provided that the current user has rights to use the system file. The following command transfers the contents of the customer table of the Sakila database to the file c:/customer.txt :
|
1
|
SELECT * INTO OUTFILE 'customer.txt' FROM customer; |
This file contains the data from the table. The space between columns (fields) in this file will be made with tabs, while new lines will be created with special characters.
This can be changed with the additional options, FIELDS TERMINATED BY and LINES TERMINATED BY (the user-defined delimiters for fields and lines):
|
1
2
|
SELECT * INTO OUTFILE 'customer.txt'FIELDS TERMINATED BY '|' LINES TERMINATED BY ' ' FROM customers; |
This approach is good for saving the data itself, but not for the complete database structure.
If we want to load the data back from such a file, we can do it in a few ways.
The first way is by using the LOAD DATA INFILE command. With this command, we can load the data from a file into the table. Let’s look at the example text file created earlier. To load the text file created earlier back into the customer table, we must write:
|
1
|
LOAD DATA INFILE 'customer.txt' INTO TABLE customer |
Another way we can load data back into the table is by using the mysqlimport tool. If you’ve added MySQL’s bin folder to your PATH system variable, just type the following in the Command Prompt:
|
1
|
mysqlimport -u root --local sakila customer.txt |
If the bin folder is not added to the PATH system variable, before running the above command, we need to locate the bin folder. We must mention that when we return the data, the names of the text files and the table in which we load the data must be identical.
Dump (make a copy) of the database to the file
This technique is already known to us from the previous lessons. We performed this exact process when preparing the base for replication. To dump the database to a file, we use the mysqldump console application. We have used this application in previous lessons, so there is no need to describe it in detail. To dump the database to file, we use the following syntax:
|
1
|
mysqldump –u root sakila > sakilaDump.sql |
Remember that mysqldump is not a SQL command, but a console application, which resides in MySQL’s bin folder, so it must be done from the Command Prompt.
We can also get this from MySQL Workbench, using the Data Export option under the Management option:
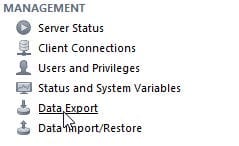
Image 24.1. Data Export
After selecting the Data Export option, the window will open for selecting the database(s) we want to export, performing the backup or migration. We will choose the Sakila base.
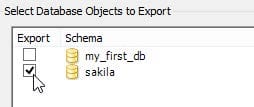
Image 24.2. Selection of base for export
After this, we can decide if we want the database export to be done so that the data and structure of each table are in a separate file (one table – one file) or united within one file. By creating a special file for each table, we allow greater freedom in subsequent manipulation, i.e. restore. We will select export to a file.
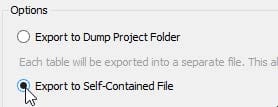
Image 24.3. Selecting the export type
We can also select and export without the data itself, that is, only the export of the database structure, by checking the option Skip table data ( no-data ).
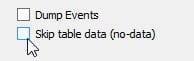
Image 24.4. The option to export without data
The backup starts with a click on Start Export , and after it is completed, we can make sure that there is a backup file with the extension .sql in the selected path.
The script file has the extension .sql, but apart from helping to discover the contents of the file, it has no other features. It is a normal text file.
In the background of this procedure the mysqldump.exe tool is called , so this procedure is, let’s say, the user-friendly way to use the mysqldump tool.
| Note:
Thus, the backup of the stored procedures is not reached. |
When we want to restore databases exported like this, we generally have two ways we can do it. The first is to use Monitor’s SQL tool. If only one database is backed up in the .sql file, we need to enable SQL Monitor with the following parameters:
|
1
|
> mysql -u root databasename < backup.sql |
databasename refers to the name of the database and it is very important to note that the database with the name mentioned must exist on the server to perform the restore.
If the .sql file contains the dump of several databases, it is enough to write:
|
1
|
mysql -u root < backup.sql |
When we dump several databases, mysqldump adds the necessary CREATE DATABASE commands to create the databases within the file, so the database does not need to be created, nor should any name be mentioned.
The second way to restore data is to use SQL Workbench. The Data Import/Restore option must be selected from the Management section:
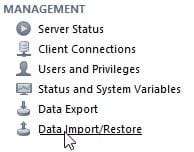
Image 24.5. Data Restore
In the window that opened, we can select:
- Import from dump project folder – restoring from the folder – in situations where the export consists of several separate files;
- Import from Self-Contained File – in situations where the export is performed from a file.
The import starts by clicking on Start Import and we notice that this is how the mysql.exe file is called , which is definitely part of MySQL Monitor.
Incremental backup
The techniques described so far, which can be used for both backup and migration, always include the backup of the entire database. Now imagine the situation where we backup at regular intervals, for example, once a week. In addition to the fact that every time we should backup the entire database, which, you agree, is not necessary, there is also a real danger to the data. Between backups, they are at constant risk, and after we back up, the next data entered is at risk until we do the next backup. This is unacceptable for serious databases.
This type of backup, which is done every time on the entire database and its content, is called Full Backup.
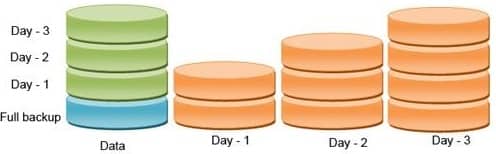
Image 24.6. Full backup
One solution is to perform more frequent backups of the entire database. Of course, this does not reduce the problem entirely. Besides, if the base is large, it takes up a lot of time and space.
The second solution is the incremental backup. And this requires a more frequent backup. But not of the entire database, but only of the changes created since the last backup, this being a much more efficient option.
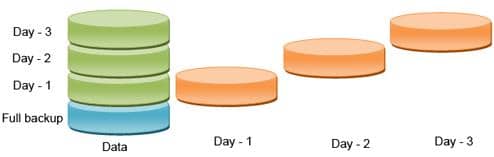
Imaginea 24.7. Backup incremental
This solution can be achieved with the help of the binary log. We know that if binary logging is on, every sql command performed on the server will be logged. It means that it is enough to save all the commands made up to the last backup, which means much less than the complete database.
The binary log can be activated in several ways (described in previous lessons). For example, setting the log-bin=mysql-bin option in the my.ini file (and restarting the server).
At the moment of activation, the binary log creates the file (in the data folder of the mysql server), which has a sequence number as an extension. For example: mysql-bin.000001 . Sometimes, the MySQL server (for example, at every restart) will close the log and create a new file, with the sequence number increased by one: mysql-bin.000002 . All these files, apart from the last one, are inactive and we can download them and use them as a backup supplement. But, further, there remains the problem of the last file that contains all the commands performed until the last deletion of the log.
That’s why we have to manually delete the log when we want to download the log files.
This is an extremely simple procedure. We just need to enable the FLUSH LOGS SQL command or the console application ( mysqladmin –uroot flush-logs ). After activating this command, a log file will appear in the given folder (with each activation, a new file is added). Now we just need to move all the files except the last one to a safe location.
In fact, our backup consists of all these log files. They contain all INSERT, UPDATE, DELETE commands.
The best backup system is a combination of FULL and INCREMENTAL backups. For example, it is best to make a FULL backup once a week and INCREMENTAL once a day or FULL once a day and INCREMENTAL at an hourly interval, of course, all depending on needs.
When thinking about a backup strategy, consider replication. This is perhaps the best way to back up high-frequency production bases, and the only reason we’re not mentioning it is because we’ve already devoted the entire previous lesson to it.
The logs can be restored using the mysqlbinlog console application. This command converts the binary log into SQL commands and sends them to the output.
E.g:
|
1
|
mysqlbinlog mysql-bin.000009 -uroot > myLog.sql |
If, after the successful execution of the command, we look at the myLog.sql file, we will notice that it contains understandable SQL commands (unlike the mysql-bin.000009 file ). Now, the script thus obtained can be activated on the server using standard methods.
The output of the mysqlbinlog application can be the server itself (through the mysql application), so the activation process of the log script can also be done automatically.
E.g:
|
1
|
mysqlbinlog mysql-bin.000009 -uroot | mysql –uroot |
The mysqlbinlog command has quite a few more options, but studying them would be out of the context of the lesson.