
Primary and foreign keys
Unit: 7 of 24
In the first lesson of this module, we started creating a database. We reached the creation of the tables and stopped to define the types of data that the columns can save, which we familiarized ourselves with in the previous lesson. To finish creating the tables, we need to familiarize ourselves with other notions, necessary for their proper creation.
Having knowledge acquired from the previous lesson, we can define the data names and types.
We will remind ourselves what a table should look like when we create it. In picture 7.1. the diagram from which the product table will appear is shown .

Image 7.1. ER diagram for the Product table
The way to add tables is already represented in the first lesson of this module. From the diagram we see that it is necessary to create three columns. We will create them now.
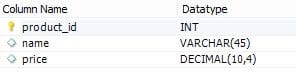
Image 7.2. ER diagram for the product table
Columns are created by entering their names in the Column Name column . After that we define the column types. Since the product_id column is the identification column, in which integer values will be saved, for the data type of this column we chose the INT type.
If you are wondering why, then this could be for a number of reasons. The first is obvious, it consists in counting the entries (rows) from the actual database. The second reason may not be obvious to us yet, but this way it is very easy for us to define the primary key or, at the end, to join the two tables with a foreign key – as we will see later in the lesson.
In the name column , the names of the products will be saved, so for the type of this column we put VARCHAR. The VARCHAR size is also set to 45, assuming that the product name will not have more than 45 characters.
For the column named Price , the decimal data type is set. It is the most convenient date for saving numerical representations and it accepts parameters. That’s why, in parentheses, I added the parameters that indicate that in this column of the table it will be possible to enter decimal values of 10 digits, on the left side, and of 4 digits, on the right side of the floating point.
When we define a table with such a structure, it will be valid, but it will not be used that often. The main problem with such a table is that there will be two or more products with the same name, price and ID number – and we always want to avoid this in databases .
So this table needs a mechanism that will prohibit the entry of a duplicate ID number. In this table, I’ve created a column named product_id, which, as you might already guess, will be used just like the ID column I talked about. This column will also be used as a restriction factor, and will not allow identical entries, as mentioned above . Such a column is called a primary key.
Primary Key
A primary key is the primary limiting factor in a table. This is a property of the column, which does not allow repeating values. Thus, it is very easy to identify any row of the column, because each row has a unique primary key. The primary key is a feature of almost every table, although it is possible to avoid entering it.
Sometimes, the table can also have several columns, which together make up the primary key of the respective table. For example, if we want that the name of a product and its price cannot be repeated, we could define the primary key on the Price and Name columns . However, in practice, the most common thing is to define a separate column, intended especially for the primary key, as in our example.
From all the mentioned, we can come to the conclusion that in our situation it is necessary to introduce the product_id column as a primary key.
We can do this by checking the PK option in the same row where we defined the product_id column :
![]()
Image 7.3. Enter the column name and data type and set the primary key
The primary key can also be set in the section below, where there are options for the currently selected column:
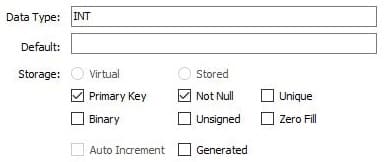
Image 7.4. Entering the primary key (2)
In image 7.4. we can also see the meaning of the abbreviations for the signs in the table in image 7.3.
I checked the Primary Key element , which defines this column as a primary key column. It makes sense that such a column will automatically have the Not Null property . In image 7.4. we can see that in addition to the options for determining a column as a primary key column, there are a lot of other additional options that can be applied to a column.
Now, we will familiarize ourselves with these options one by one.
DEFAULT
By entering values into this text field, we have actually assigned the column a default value that it will have if no value for this column is specified during data entry.
NOT NULL
This option defines that such a column will be required to have a value during insertion. For example, this means that if we try to insert a new product into the table without defining the primary key, an error will be raised. MySQL will throw an error, which means that in this way you provide the field with a value.
The column that is the primary key also has the NOT NULL property, which makes sense because such a column will be used to identify the data. Even if you try to disable the NOT NULL property for this column, you will be forced to enter a value into it each time, if the column is set as a primary key.
UNIQUE
By setting this option, we have achieved a similar effect to the PRIMARY KEY property. In such a column, it will not be possible to enter a date with the same value and this feature is identical to the PRIMARY_KEY property. Unlike the primary key, the column that is only UNIQUE can also accept NULL values.
The primary key is automatically both UNIQUE and NOT NULL.
BINARY
Enabling this option converts the column to the binary type, which is identical to the varbinary type .
UNSIGNED
The UNSIGNED option can be checked for columns where one of the numeric types is chosen as the date type. With this option, only positive numerical values can be entered as data of such a column.
ZERO FILL
By activating the ZERO FILL option on a column, we can influence the display of data. As in the previous case, this property can only be applied to columns with numeric data type. If INT(8) is entered as the date type of a column, below you can see how some arbitrary data would look with and without the zero fill option enabled :
| with zero fill | without zero fill |
| 00000001 | 1 |
| 00000012 | 12 |
| 00000123 | 123 |
| 123456789 | 123456789 |
Table 7.1. Numbers with ZERO FILL enabled or disabled
AUTO INCREMENT
I have already mentioned several times that in the table we are creating there must also be an identification column, specially intended for the role of the primary key. The truth is that we created such a column in the lesson. However, such a column would not have made any sense if, during each data entry, we also had to enter the sequence number of the date/information. That’s why the AUTO INCREMENT option is used, which automatically enters the numbers in such a column.
We will enable the option because this behavior is appropriate for our example.
By default, the numbering will start from number 1 and increase by one after each input. The numbering can start from any number (integer) and can have an unlimited increment. These parameters are called Seed (the number from which the numbering starts) and Increment (the number by which each new column will be increased).
If we want to set another initial value of the AUTO INCREMENT property, this can be done by opening the Options tab :
![]()
Image 7.5. Choosing the Options tab
and by entering the value in the Auto Increment field :
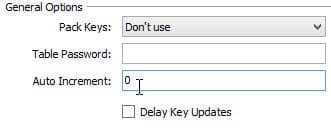
Image 7.6. Setting the Auto Increment option
Let’s now summarize what we did while creating the product table . In image 7.7. the appearance of the window for creating the product table is represented , with all the necessary data entered.

Image 7.7. The layout of the Product table columns
Let’s summarize:
- productID – identification column, primary key, does not accept NULL values. In this column, the values are entered and increased by one, automatically;
- name – the column for entering the name of the product does not accept NULL values, and the maximum length is 45 characters;
- price – the column for entering the price of the product does not accept NULL values, it accepts numbers with no more than 10 digits and 4 digits of the fractional part.
After the mentioned, click on the Apply button . The window will be displayed where you will be able to see the query generated according to your settings. We mention again that creating the tables in this way, using MySQL Workbench, is just an easier way to get to the query that needs to be executed on the MySQL server to get the desired table. In the following module, we will learn to write such queries ourselves.
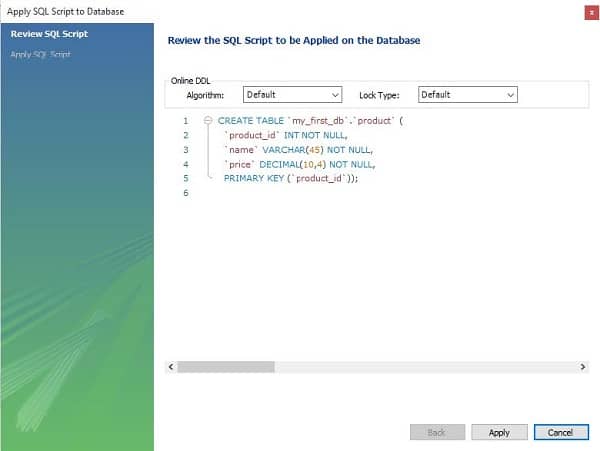
Image 7.8. The generated script for creating the product table
We validate this query again, so we click the Apply button and the query will be executed on the server, which means our table is also created.
After creating the product table, we must also create the rest of the tables, using the EER diagram as a model. The next table we will create is the table for storing customer information (we will call it the customer table ). If you do not remember this diagram well, then I advise you to re-read the ” Database Design ” lesson in the first module.
We will not cover the creation of this table in detail. The creation process is already familiar to you from the procedure explained for the Product table, so we will immediately present the appearance of the window for creating the table with all the necessary data:
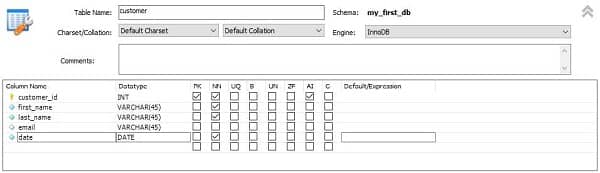
Image 7.9. The appearance of the window for creating the customer table
We will summarize the table in the column domain:
- customer_id – identification column, primary key, does not accept NULL values, the value is assigned automatically and is increased by one (AUTO_INCREMENT).
- first_name – the field for entering the customer’s first name does not accept NULL values, and the maximum length of the entry is 45 characters.
- last_name – the field for entering the customer’s last name does not accept NULL values, and the maximum length of the entry is 45 characters.
- email – the field for saving the email address accepts NULL values, i.e. it is not mandatory to enter values, and the maximum length is 45 characters.
- dates – the column for entering the customer’s date of birth does not accept NULL values.
After creating these two tables, we can proceed with converting the conceptual design into a logical one.
Foreign Key (Foreign Key)
We will recall what the ER diagram of the base we are creating looks like:
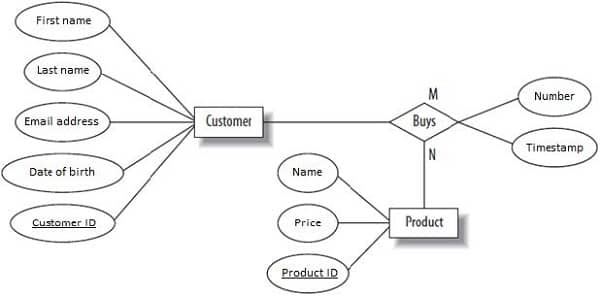
Image 7.10. ER diagram of the sales base
We have created tables according to the entities Customer and Product. It remains for us to analyze what to do with the relationship that exists between these two entities. Considering that the relationship has its own attributes that describe it better, but also the fact that it is necessary to save information about sales, we come to a logical conclusion, namely that, in this case, the relationship will become a new table. In general, the many-to-many relationship almost always creates a new table.
We will now look at what columns this new table we will create will have. We see that the relationship has the attributes Number (for noting the purchase number) and Timestamp (for saving the purchase time). It is logical that they also need to write down the information related to the customer who bought and what they bought. This means that it is necessary to write down the customer and which product he bought. This means that, apart from the two columns we obtained from the attribute mapping, we need to create two more columns for customer and product identification.
What is the best date to identify the customer and the product? The best candidates for this process are precisely the identification columns of the customer and product tables .
Columns that represent references to other tables are called foreign keys .
Now we will create the columns we talked about.
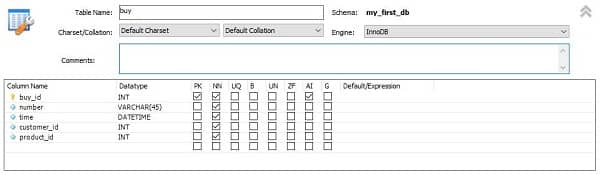
Image 7.11. Creating columns to the Buy table
The customer_id and product_id columns actually represent the values of these columns for a customer and a specific product. These are, in fact, columns with which the relationship between the tables is made, that is, these are the foreign keys. However, we have not concretely defined anywhere this relationship we are talking about. The customer_id and product_id columns are simple columns, just like any other. This means that in no way is it mentioned that these columns are foreign keys. MySQL will treat these columns like any other column.
Now we will generate the query to create this table by clicking the Apply button , and then start this query on the server, also by clicking the Apply button . In this way, we will create the table.
After creating the table, we will enter, just for demonstration, a query. We haven’t covered data entry queries yet, but now we’ll demonstrate just one phenomenon of them.
The query for entering data into the buy table is as follows:
|
1
|
INSERT INTO my_first_db.buy (number, time, customer_id, product_id) VALUES ('234/23', now(), 2, 5); |
What did we achieve with this query?
In the buy table, I have inserted a date, i.e. a record or a row. For the purchase number, I entered 234/23 , for the purchase time I entered the current time (using the now() function, I obtained the current date and time), as the customer ID I entered the digit 2, and as the product ID I entered the digit 5 However, in the tables for saving customers and products we have no entry. This means that in the sales table we added the sale that took place with non-existent actors: with a non-existent customer and with a non-existent product.
In addition, when we perform such an input, the error is not even signaled, because there is no system that will tell us that the product with no. 5 and the client with no. 2 does not exist. Such errors (called logical errors) are very dangerous, because they do not prevent the execution of the program, the program simply does not work correctly, and it can be difficult to locate them immediately, if we do not have experience.
You, as a databased developer , must strive to never let such things happen to you. The only solution is to be careful by moving the logic to your own application that manages the database or by defining additional logic on the database itself.
The best solution would be to use the built-in mechanisms, which already exist in a certain database management system. These are systems designed to maintain referential integrity, which is achieved by defining the Foreign Key Constraint .
Referential Integrity (Foreign Key Constraint)
The foreign key is the symbol of the relational database. Foreign Key Constraint represents the physical relationship between two tables. In other words, it does not allow a value to be inserted into the table, in case such a value does not exist in another table in the related column. Accordingly, it does not allow exactly what we did earlier.
Remember that foreign keys with restrictions/constraints do not work on the MyISAM storage engine.
Since we have already created the buy table, now we will start the option to modify the created table. Modifying the table is also called ALTER.
Note that it is recommended that you first create the tables with everything you have in mind except the foreign keys, click Apply, then run Alter and add the foreign keys. This will avoid possible problems with MySQL Workbench not recognizing the columns, indexes, or ranges where you want to place the foreign key.
Modifying the existing table in MySQL Workbench is started by choosing the Alter Table… option from the context menu that we get with a right click on the table.
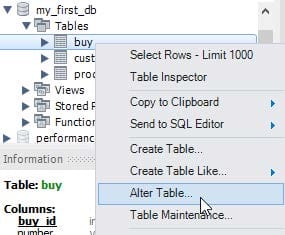
Image 7.12. Alter Table option for changing the table
In this way, we obtain a window identical to the one in which we created the table.
To add a foreign key, it is enough just to choose the Foreign Keys tab from the table creation window :
![]()
Image 7.13. Choosing the Foreign Keys tab
In the window that just opened, in the Foreign Key Name column, add the name of the foreign key and choose the referential table (the table with which the relationship exists). In our case, this will be the customer table .
![]()
Image 7.14. Adding a foreign key
After that, on the right side of the window you will choose specific columns from the table you are creating and from the reference table. In our case, both columns have the same name, i.e. customer_id, which is a good practice.
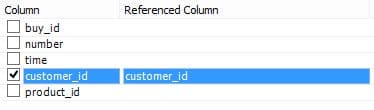
Image 7.15. Adding a foreign key (2)
Finally, at the Foreign Key Constraint we can (but not necessarily) introduce additional parameters. These are: On Delete and On Update features.
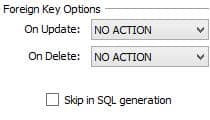
Image 7.16. Additional foreign key parameters
We can see that these features are initially set to NO ACTION .
First of all, we need to understand the context in which these parameters are important. Now imagine the situation where in the base you have created there are hundreds of products and as many customers and that in the base you have registered a large number of products from different customers who bought different products. What would have happened if we had deleted a customer from the customer table ? All sales, that is, in all entries in the sales tablein which this customer appears, the data indicating a non-existent customer will remain. These very parameters are related to the question: what will happen to the linked data in such situations? To simplify things, we will look at tables and records in the following way. The first time we ask ourselves the following question: What would have happened to the records in the sales table in which a certain customer participated, whom we want to delete or whose ID column we want to change?
We will now see the meaning of all the options available for these parameters in the situation described above:
- RESTRICT
In the described situation, deleting the client or changing the identification column will not be allowed.
- NO ACTION
In MySQL, this option is identical to the RESTRICT option described earlier, that is, NO ACTION has the same effect as RESTRICT. In general, this is a default option, in case nothing is set. In some versions of the SQL language, respectively in other relational database systems, these two options have a different meaning. In systems where there is post-key verification, these two options have a different meaning.
- CASCADE
For the On Update parameter, this option represents a very good solution. If this option is chosen, by editing the customer’s primary key, changes will be made in all the linked tables, respectively in all the places where this customer ID that we modified appears.
If this option is used for the On Delete parameter , it can be very dangerous, because it can cause data loss. In our case, if we had deleted the client, all his purchases would have been automatically deleted. This is not exactly the behavior we wanted to have, therefore, in such situations, this option is not recommended.
- SET NULL
A better option than the previously described one, at least when we talk about deletion, is, of course, the SET NULL option. When this option is enabled, if we had deleted the customer, then in all purchases of this customer, for the customer_id column, the null value would have been entered.
The same situation would have occurred during the change of the customer ID, which does not have a special function either.
We will now return to the creation of foreign keys.
Similarly, we create the second foreign key, because our buy table has a relationship with the two tables, respectively with the product table and with the customer table .

Image 7.17. Adding the second foreign key
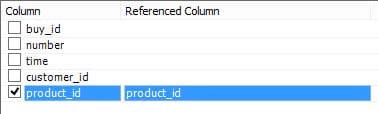
Image 7.18. Adding the second foreign key (2)
When it comes to foreign keys, we must also mention the problems we can face during work. You should avoid entering data into the tables you want to link with foreign keys before doing so, because MySQL Workbench may not allow you to create a foreign key. The same thing can happen if you try to join/join two tables, but the columns have something different in them (eg different data sizes or something similar). This means that the columns you join must have identical settings. The last thing about this segment is the index section. To set a foreign key, MySQL Workbench creates indexes on those columns before setting the foreign key. Sometimes MySQL Workbench may not create indexes,
After adding the foreign keys, I also created the basic logical design, that is, I executed the mapping of the conceptual design into some concrete tables with relationships. In the next module, we’ll familiarize ourselves with basic SQL syntax, since so far we’ve generally used the built-in Workbench environment for query generation.
Exercises for independent work
Exercise 1
Problem:
Based on the examples in the lesson, create a new database in which you will store the employees and their salary amounts for each month. This implies, of course, that you will have the entities employees and salary and you will have a relationship in the form of payroll. Although you might think you need to create three tables, you will actually create two, where for each salary paid you will save the employee whose salary was paid and of course associate it with a foreign key. Do not forget the other information about the employees, but also those related to the salary (tax, the date you will pay the salary, gross, net amount) – imagine creating a table that can be used in the accounting department during work.