Working with the database – migrations
Unit: 7 of 12
After we have familiarized ourselves in detail with the views and the Blade Template Engine, which makes it easier to work with that part of the MVC application, now it is time to familiarize ourselves with the business logic, namely working with the database and models. In this lesson we will talk about the first stage of working with the database (models), namely, with migrations.
What are migrations?
Migrations represent the beginning of working with business logic, respectively with models in MVC, i.e. Laravel. Migrations serve us to create a table, define the fields in that table, and possibly some test data that we will use while working on the application for functionality testing. We will show the work process exactly in this order, on a concrete example.
Database configuration
Before starting work, we need to have a database installed. Laravel can work with the following databases (taken from the Laravel documentation, version 9):
- MySQL 5.7+
- PostgreSQL 9.6+
- SQLite 3.8.8+
- SQL Server 2017+
In most cases, if we use one of the XAMPP, WAMP, etc. packages, they will include MySQL or MariaDB (which is basically the same thing in most cases), so we will use the usual database setup.
If we want to change what type of databases we use for our application or anything else related to databases (database server address, port, database name, username or password), we will do it in the .env file , which we can find in the main Laravel folder. In the image below we can see where we change that data:
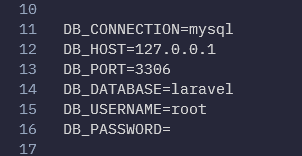
Image 11.1. Configuration items for the database in the .env file
As I said, it is common to connect to the mysql database located on localhost (address 127.0.0.1) on port 3306, with the username root and no password. The database here is Laravel, but of course it can be any other database.
If your situation is somewhat different, you need to make changes to the .env file and save it. Once you’ve done this, you’ll open the tool you use to work with databases (MySQL Workbench, PHPMyAdmin, HeidiSQL, or any other tool) and create a database that’s in the DB_DATABASE field. And that’s where the manual work ends. The rest is done through the Laravel command line (console) and in Laravel’s PHP files.
| Note
If we use the phpsandbox.io application, then we don’t have to do any of this, because usually, like every time a new notebook is created in this application, everything is configured and it’s up to us if we will continue to create tables, columns and possibly test data using Laravel migration. |
Having done this, we can create a migration. We create migrations using the command line from the project we are working on. Let’s say we want to create a table to store user data, and that table will be called user_data. It is enough to start the command line and enter the following command:
|
1
|
php artisan make:migration create_user_data_table |
If we typed everything correctly, we will see that the migration has been created, as in the screenshot below:

Image 11.2. Creating the migration using Laravel Artisan
Basically, what have I done now? In fact, we have created a file (which we could have created manually, but of course it is easier for us through the command line) and we can find it in the database/migrations folder, as we can see in the following image:
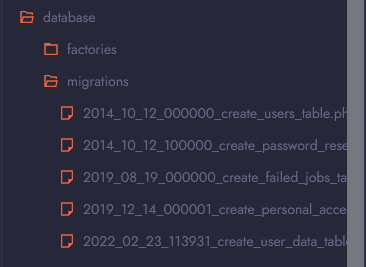
Image 11.3. The last file is our migration that we created via the command line
Once we have created the migration, we can open this file and start defining our table. In the file we will find something like:
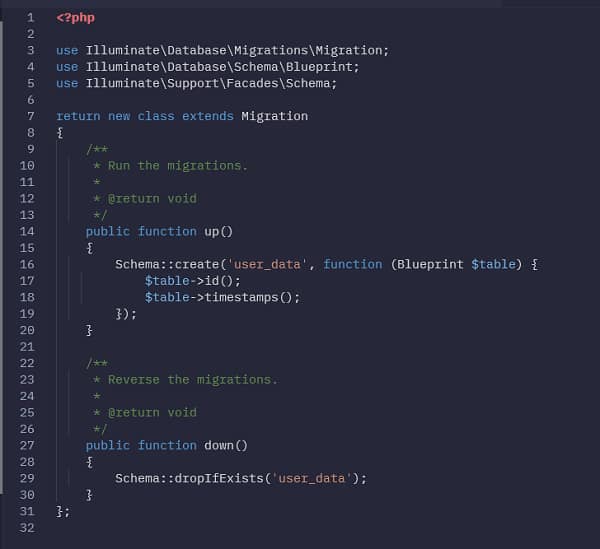
Image 11.4. The contents of our migration file
We see here that we have two methods in this class, up() and down(). In the up() method we will define what actually happens when we perform this migration, i.e. the table that will be created with certain columns. On the other hand, in the down() method we define what will happen if we pull back the migration, that is, we say we don’t need it anymore. In most cases, this will delete the table, all columns, and its contents.
What we can also notice is that Laravel was smart enough to realize, based on our migration name, “create_user_data_table”, that we actually want to create a table called “user_data”. Of course, if an error occurred or we simply need to change the name of the table, this can be done here.
After that, we see that in the up() method it is common to create three columns: id and two timestamp columns (created_at and updated_at), and resolve both columns with the timestamps() method. Of course, we don’t need to have these columns formed normally and we can simply delete them, but they are placed here because we need them in 99% of cases. We also have the ID for the primary key with autoincrement and timestamps so that we can store the data when it is first inserted into the column and when it is last modified, which can be very useful.
Now let’s see how we could create more columns in this migration and how simple this process actually is. We will create columns for the user’s first name, last name, as well as for the phone number, email and date of birth. This is something we need very often in an application.
We would do this in the following way. Between the ID and timestamps columns we would add the following columns:
|
1
2
3
4
5
|
$table->string('first_name');$table->string('last_name');$table->string('email');$table->string('phone');$table->date('birthday'); |
The end result would be the following:
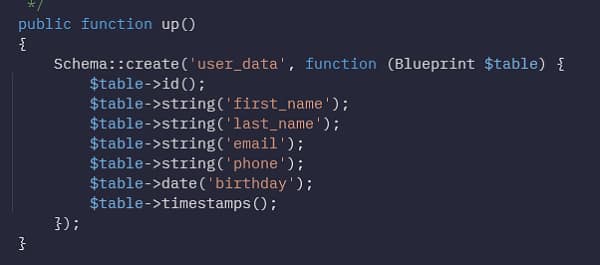
Image 11.5. Creating additional columns in migration
| Additional Information
Here we will mention that all the types of columns you can create through Laravel can be found at the following link, in the official documentation, with smaller examples for each of them: https://laravel.com/docs/9.x/migrations#available-column-types |
After defining the fields in our migration, it remains to run the migrations in the command line. Note that it is common practice to now run any migrations that were left unrun since the last time we ran migrations (we didn’t do this before, so everything will run). Such a command would look like this:
|
1
|
php artisan migrate |
However, if you want to refresh the database, i.e. overwrite the current state of the database and rerun all the migrations you have, you will run a slightly different command:
|
1
|
php artisan migrate:fresh |
If I have written everything correctly, the result will be as in the following image:
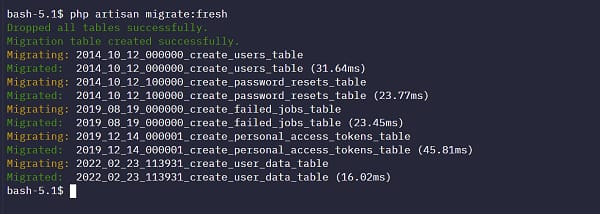
Image 11.6. Running migrations in terminal/command line
We can see that all migrations have completed successfully and we now have our user_data table ready to use in the database. We won’t check this here, but you can certainly do this using MySQL Workbench, phpmyadmin or another tool, so open your working database and check if you have this table in your application.
With this, we have completed the practical implementation of the migration, that is, of the table with our fields, and we can move on to work on our models, which we will see in the next lesson.
To summarize, we need to create a new migration using “php artisan make:migration migration_name”, open the generated file and then define which columns we want with their data types. After doing that, we will run the command “php artisan migrate” or “php artisan migrate:fresh”, which will create our own column table, which is now ready to go.
The part of MVC that migrations relate to is: