
The plug-ins
Unit: 6 of 13
A WordPress plug-in is program code, prepared in a specific way, that extends or modifies the basic functionality of the WordPress system. We can say that plug-ins are part of the software that contains a group of functions that influence the functioning of the WordPress site.
WordPress plugins, like the core, are written in the PHP language and are easy to integrate into your core installation. Plug-ins themselves cannot function independently without WordPress. Most plug-ins are written in such a way that no programming knowledge is required to use them. However, every plug-in is different, and the application of a particular plug-in depends on what the author envisioned.
For example, at its core, WordPress supports the functionality of image galleries, but in a rather limited form. For more advanced (but also different) options, we use one of the available gallery creation plug-ins. Also, at its core, WordPress does not have a contact form, but by simply installing one of the contact form plugins, we enable this option as well. There’s a saying in the WordPress community that if you can’t achieve something you set out to do, there’s probably a plugin for it.
WordPress is an open system, so if you have adequate knowledge of PHP, HTML and JS, as well as other necessary languages, you don’t need to use plug-ins at all. With this in mind, you can program a code yourself and thus create the photo gallery on your website, but an easier way would be to choose one of the free or paid plug-ins that provide the same thing for you .
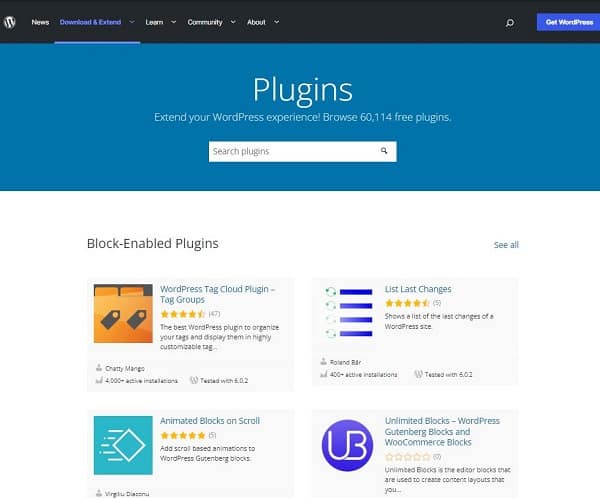
Image 6.1. wordpress.org/plugins1
As a basis for working with plug-ins, we also offer you the plug-in repository found at the following address webwww.wordpress.org/plugins. At the time of writing, there are just over 60,000 plugins available in the said repository. Many of them are very useful and regularly updated, but there are also many plug-ins that do not work properly, have not been updated for a long time, or are simply very poorly made and unsuitable.
You should know that anyone can create and publish plug-ins. There are also a large number of plug-ins that do the same thing. In addition to this, a small number of plugins are created by the WordPress team; most are created by different authors who contribute to the creation of this plug-in directory. This is not a problem at all, quite the contrary, but you should be aware that some plug-ins do not work very well, as I already mentioned. Read other users’ opinions too.
Because of all the mentioned, choosing plug-ins can be hard work and sometimes it can take a lot of time.
For example, if we search for the keyword gallery (gallery), we get a lot of plug-ins related to the searched query.
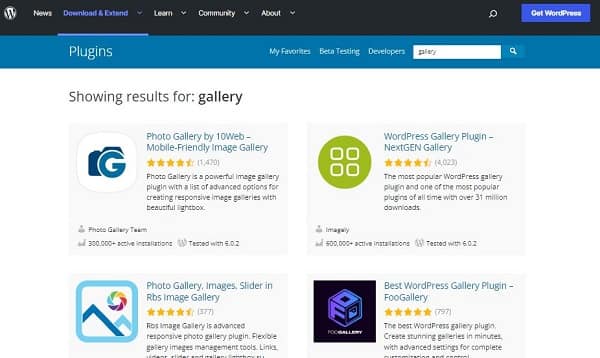
Image 6.2. By typing the keyword gallery into the search engine, we will get over 1,000 results2
| Advice
If you’re not sure which plug-ins to choose, don’t install many at once just to test them; it’s worse if you leave them all active on the site. If several plug-ins do the same thing, conflicts can occur between them. Also, a large number of plug-ins can slow down the site. |
There are a large number of free plug-ins, but there are also plug-ins that you will have to pay for in case you want to use them. For most users, the free ones are an obvious choice, but keep in mind that the ones you pay for get technical support and (generally) have more features and/or perform tasks better, but that doesn’t have to be the case a rule for paid plug-ins.
Also, although the official website www.wordpress.org is the central place for choosing plug-ins, many of them cannot be found on this site. Many plug-ins can be downloaded directly from the websites of the authors who created them.
Installing plug-ins
The plug-in can be installed in several ways.
Installing as an administrator (search)
Perhaps the easiest way to install a plug-in is to search through the admin pages. In other words, a disadvantage of this way of working is that we are limited only to free plug-ins from the official repository.
In the administrative navigation on the left you can find the Plugins option. Within it, the following sub-options are found:
Installed plugins – displays all available plug-ins already installed in the system;
Add New – the option to add a new plug-in.
We choose the option Add New and we get to a screen like this:
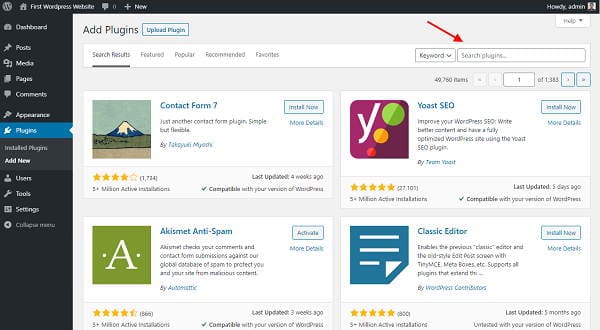
Image 6.3. Searching for plug-ins through the interface
After entering the keywords in the search field, which is marked in the image above, and after confirming them by pressing the Enter key, the relevant results will be displayed. You can search by name, keywords, description, etc. In the representation of plug-ins, it is also displayed how users have evaluated the respective plug-in, as well as other general information. In the right corner of each plug-in, there is the Install Now button, which starts the installation. In case the plug-ins are already installed, instead of the mentioned button, it will say Active. If the plug-in is installed, but its update is available, it will say Update Now.
If we choose the option Install Now, after a few seconds the installation will start. WordPress will again download the desired plug-in from the Internet and install it (image 6.4., second step). After the whole process is done successfully, we will see the result as step 3 in the image below.
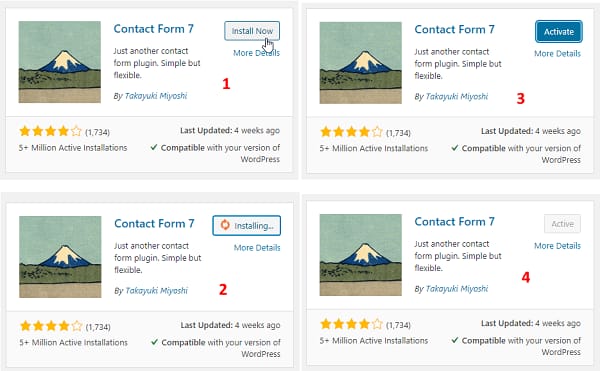
Image 6.4. Plug-in installation steps
As you can see in the image above, WordPress has downloaded and installed the desired plugins. In this example we have the Contact Form 7 plug-in. Now we can activate it (Activate) or we can go back to the previous page without activating the plug-in- the one just installed. We’ll get into the details of plug-in activation and handling a little further down in the text.
Although this installation process appears to be simple from the users’ point of view, in fact, it requires some very complex operations. We don’t have to worry about this, but our server, on which the WordPress site is installed and running, has to perform some operations that include downloading files, unzipping them, encoding to a certain location, etc. According to this, some problems may occur. For example, for several reasons it may happen that the server cannot copy the files to the appropriate place. In such a situation, the only solution is to check the settings on the server, which is beyond the scope of this course.
| Additional Information
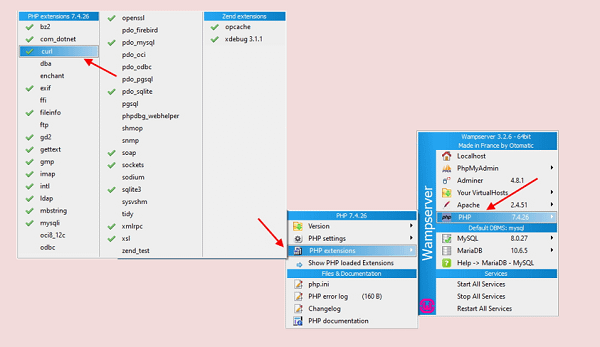
In case you are working locally, in the WAMP server, and some errors occur during the installation of plug-ins, check if the PHP extension named Curl is enabled , found within the WAMP menu. This is a common situation that can occur while working in WAMP. If no errors occur, there is no need to take any action.
Image 6.5. The Curl option (PHP extension) within the WAMP server |
Installation through the administrator side (file upload)
Earlier I said that the plugin repository can be found at the link www.wordpress.org/plugins. I searched for the same repository through the installation part, in the upper part of the lesson. Therefore, if we search through the admin side and choose the Install Now option, as we have already done, we will not exit the environment of our WordPress site . On the other hand, this is not the only way to install it. If we want to have one of the plug-ins available from the mentioned repository, we can download the zip file from the browser, also from the above-mentioned address.
After we get the zip file, it needs to be transferred to the site and installed there. And this is where the interface comes to our aid. We return to the administration page Add New and choose the option Upload Plugin, on which we also see in the image below.
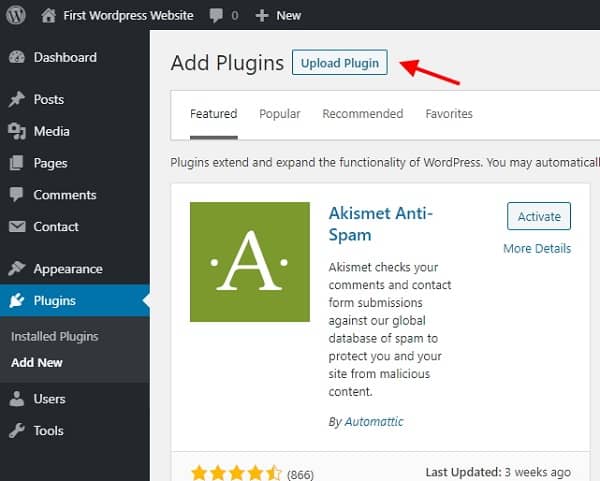
Image 6.6. Upload Plugin option
After that, in the dialog that follows, choose the zip file that we previously downloaded and start the installation. And in this case, the server will download the files and place them in the appropriate location, but it will also offer the activation of the plug-ins.
This option is very useful in case we work with some of the paid plug-ins, because they are not found in the official plug-in repository. In this case, after we pay for the plug-in (on one of the sites that offer this type of plug-ins), we get a zip file that we can install.
Manual installation (FTP)
Another installation option that requires a bit more work is to install manually and transfer files via FTP. This method is a little more difficult for beginners.
Just like in the previous version, here too we need to get the zip file of the plug-in. We will open the archive (zip) and transfer it to a folder on our computer. Using one of the FTP clients we’ve already mentioned, we’ll copy the entire plugins folder to the Plugins folder of our installed WordPress site. The plug-in must be found at the address public_html/wp-content/plugins . If it is not found in this location, WordPress will not recognize it.
Also, be careful when creating duplicate folders. For example, you happen to download a certain plug-in, and after unzipping it, you get the folder with the name of the plug-in, and within this folder you get another folder, also with the name of the plug-in and with the necessary files for its installation. In this case, you will not copy everything with the duplicate folder, but you will copy the folder directly, that is, the folder of the plug-in where the necessary files are located directly. Watch the video of this lesson for a more detailed explanation.
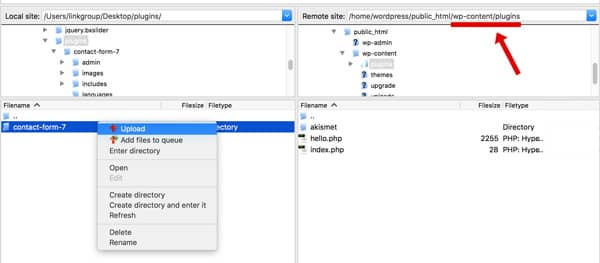
Image 6.7. Uploading plug-ins via FTP
This is another way in which, if we successfully transfer the files via FTP connection to the server, and they will be placed in the appropriate location, we can say that the plug-in is installed, but not activated.
| Note
We install the plug-in via the FTP protocol only if we upload files to a remote server. When we work on a local server, so we only simulate the operation of the server, we do not need an FTP client for uploading. |
Use of plug-ins
As we already said, a given plug-in can have two general states:
- installed;
- activated.
Regardless of which installation method you choose, the plug-in cannot be used until it has been previously activated. If you use the interface during the installation process, WordPress will provide you with activation immediately after installation. In any case, on the page Installed Plugins you can find the list of all available plug-ins and the illustration of their status.
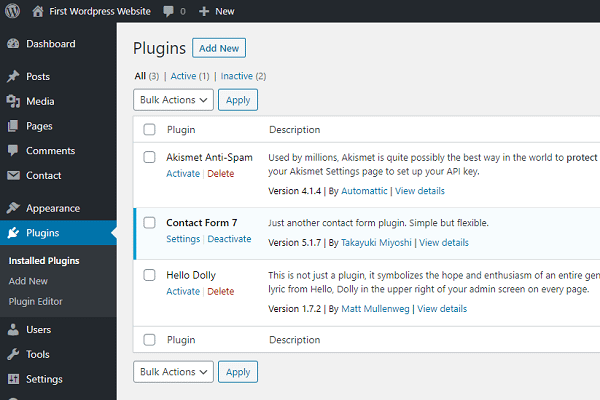
Image 6.8. Installed Plugins admin page
As we can see in the image above, the mentioned administration page shows us the list of all installed plug-ins, whether they are activated or not. Next to each plug-in are presented its options, as well as additional information. At the top, there are the options for filtering, with which we can display all plug-ins (All) or only the active ones (< a i=3>Active) or only inactive ones (Inactive) etc.
Under each inactive plug-in the option Activated, which starts the activation, as well as the options for editing the plug-in (Edit) and those for deleting it (Delete). Under the name activated plug-in you will find the setting options for a specific plug-in, and they only depend on the specific plug-in ( Settings), then there is the option to deactivate the plug-in (Deactivate) and the already mentioned option to edit them (Edit). The plug-in cannot be deleted if it is not previously deactivated. The deletion can also be done from here or it can be done manually, through the FTP client. With FTP you cannot delete activated plug-ins! If you delete the activated plug-in, an error will occur in the operation of the site, because the site can no longer find the necessary files.
It should also be mentioned that, in case you deactivate the plugin and later activate it again, the settings you will make in it will be saved (WordPress saves them in the database and does not delete them when they are deactivated ), while, on the other hand, if you delete the plug-in and later reinstall it, any settings of the plug-in will not be saved.
Within the WordPress CMS system, we also have the option to change the plug-in itself. The edit option is in the menu Tools and its items Plugin File Editor. In the central part is the editor, and since it is PHP, JS, HTML or other similar code, there are no formatting options (bold, italics, etc.). On the right is the list of files. Clicking on a file name will load it into the editor. Pay attention to the drop-down menu indicated by the red arrow in the image below. This shows you which plug-in you are currently editing. If you accessed this page from the administrator navigation (on the left side), the first plug-in placed in alphabetical order will be chosen in the editor. If you choose the Edit option under the name of a particular plug-in, the files of that plug-in will be loaded into the editor.
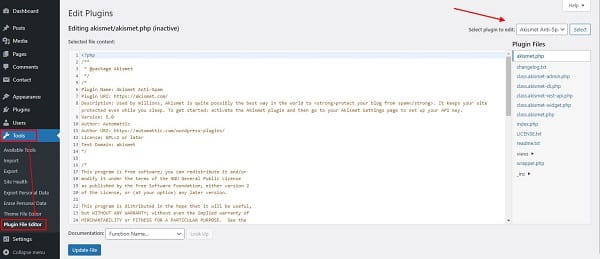
Image 6.9. Edit Plugins admin page
The editor allows us to change a certain plug-in in a simple and fast way by modifying its files. However, we must be careful. Changes in the code require knowledge of PHP and other languages, but also knowledge of the structure of a concrete plug-in. Editing a small detail can create problems for the entire plug-in, even the entire site.
Updating plug-ins
From time to time, information about updating plug-ins will appear. If this happens, an update is recommended as soon as possible. Updates, in general, eliminate errors, security omissions, but also bring new functionalities. On the other hand, the update can sometimes also cause certain problems that you need to pay special attention to.
![]()
Image 6.10. Information about the new available version of the plug-in
If we look again at the plug-in search (image 6.11.), we will see that under each plug-in there is an item about the compatibility of the plug-in with our current version of WordPress. If it says under the plug-in that we don’t have the right version of WordPress, we won’t update the plug-in because we will most likely have problems. Then it is recommended that we follow the updates of WordPress or the plugin itself, until we get a version match and a display as shown in the image below.
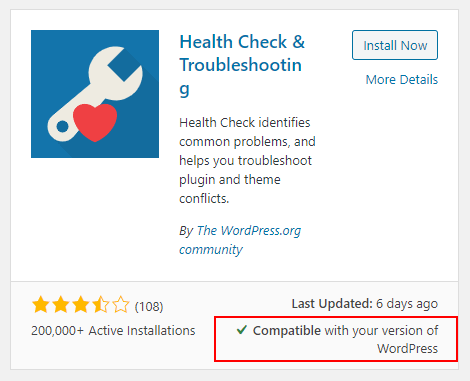
Image 6.11. Plug-in compatibility information
If the text below the plug-in is: Untested with your version of WordPress, you must test yourself if the plug-in works behaves correctly during operation. If it causes problems with the page view or if its options don’t work properly, disable it and delete it, then find the best alternative for your site.
| Additional information
As I already mentioned, there are thousands of plug-ins that can be used. In this course, we explain only a few of them, which we consider necessary for work. Depending on the project you are working on, you will need to research and find the appropriate plug-in. |
When downloading the plug-in, you get:
1. Screenshot taken on the website http://www.wordpress.org/plugins (Accessed: November 21, 2022)
2. Screenshot taken on the website http://www.wordpress.org/plugins (Accessed: November 21, 2022)