Themes and their visual editing
Unit: 7 of 13
Using CMS solutions, a simple manipulation of the pages on the website is ensured, as well as a simple manipulation of the other content. A specific user, with certain privileges (site owner, editor, etc.), can enter content with basic formatting (for example, bold, italic, text alignment, and others), and the rest remains within the CMS. In other words, after we create a certain piece of content, a post, a page or others, we create an entry in the database. When it is necessary for this content to be displayed to the visitor, WordPress withdraws that content, but also other relevant information from the base, forming them visually and only then displaying them to the visitor.
A part of the WordPress system is responsible for this visual theme editing (theme), which is made up of various elements, including HTML, CSS, PHP and JS files, images and many other elements. We can say that the theme is a set of specifically structured rules, so that the WordPress site looks and behaves in a specific way.
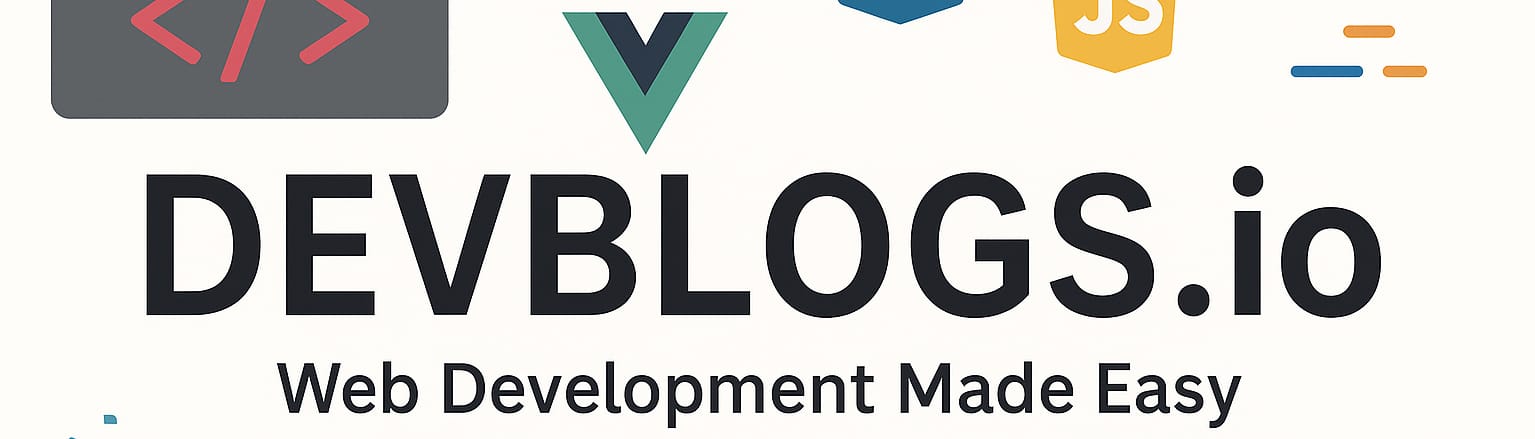
The theme can completely change the appearance, but also the user’s impression of the site. If we compare several WordPress sites on the Internet, which look completely different, and if we introduce the same theme, all the sites will look identical, differing only in content (text, images, links, etc. ), because the theme cannot influence the content, the exception being the case where the respective content is stylized.
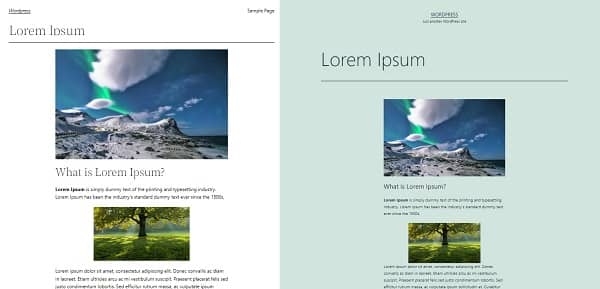
Image 7.1. Same post shown in themes Twenty Twenty Two (left) and Twenty Twenty One (right)
Themes allow us that, after a certain time, with the change of the theme, the entire aspect of the site changes as well, without having to create the site “from scratch”, but this is not not a simple process at all, as each theme, like plug-ins, requires settings according to its own rules. For example, we will specify a single detail. A detail that frequently appears on websites is the so-called sidebar. The sidebar is a part of the page view that is usually displayed vertically in addition to the central content. Certain themes have support for a sidebar in which we insert elements (widgets) according to our own desire, some have two or more (for example, on the left and on the right), while others have no sidebar. In this context, in case we change a theme from one with sidebar support to one without sidebar support, we must also set what will happen to the elements found in it. This is just one of the details. Therefore, it is desirable to research and choose the theme before creating the entire site, as a later change is possible and is a fairly simple process, but you may have a lot of work to do in terms of settings. The content should not be re-entered, but it should be represented in an appropriate way.
| Additional Information
The installation of WordPress is achieved with several predefined themes (already installed), one of which is activated. Only one theme is active at any given time. We cannot have a WordPress site without an active theme. Activating a new theme deactivates the currently active theme. Every year, WordPress gets a new predefined theme, whose name corresponds to the year in which it appeared. |
Theme operation
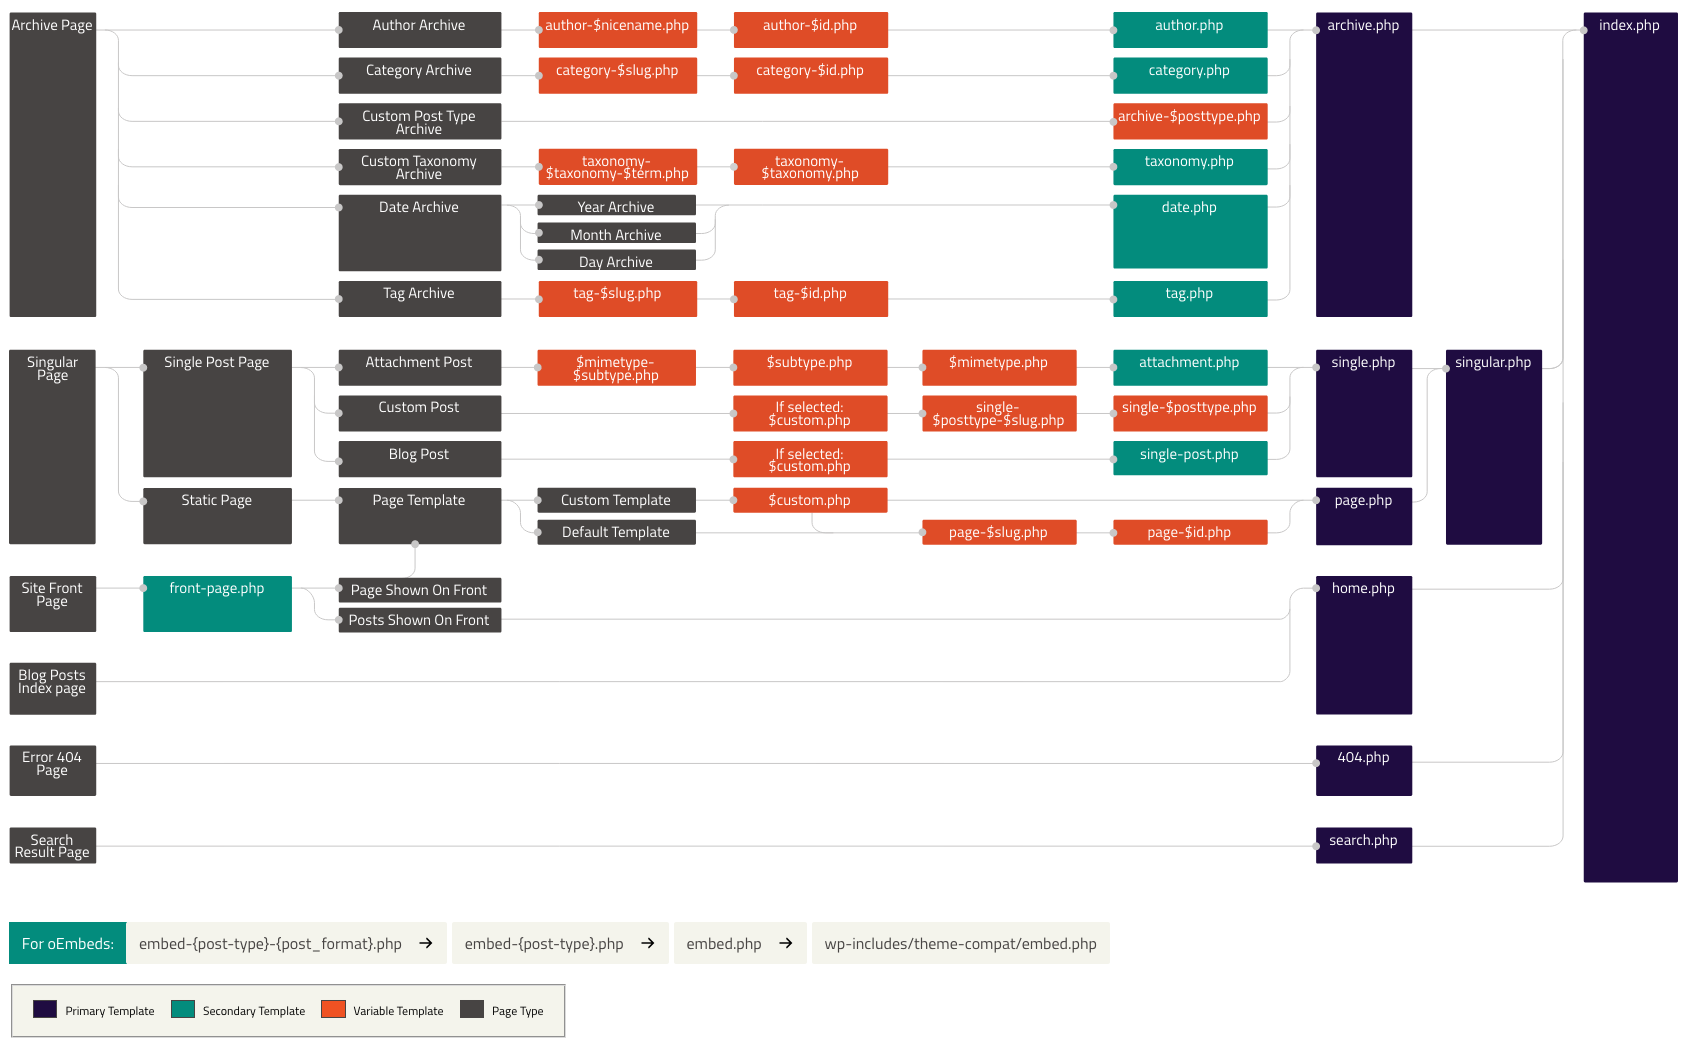
The basis of each theme in the WordPress system is the template files (template files). These are specific to each theme, but follow a certain hierarchy (template hierarchy), which is defined in the WordPress system (see the image below).< /span>

Image 7.2. Template hierarchy. Image source, larger version and more information1: https://developer.wordpress.org/themes/basics/template-hierarchy
Based on this hierarchy and rules, when it is necessary to display a certain part to the website visitor, WordPress takes the base content that it needs to display and, based on this content, chooses a specific template file and load from the active theme. The content is then inserted into the uploaded file, the final rendering is created, and finally sent to the browser and visitor. All this takes place in less than a second on the server, every time the user searches for any page.
Therefore, it is clear that the creation of themes is based on certain strict rules, which must be followed in case we want to create themes. You can find more about creating themes at the following links: https://developer.wordpress.org/themes/getting-started/ and https://codex.wordpress.org/Theme_Development. Knowledge of HTML, CSS, JS and PHP languages is implied. On the other hand, there are also many free and paid themes that we can use and that offer us, more or less, the same possibilities to adapt and modify the representations.
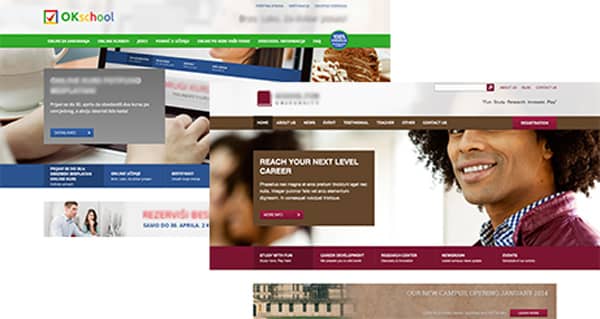
Image 7.3. The same theme adapted for two different sites
If we choose a theme that matches our site and if we configure that theme correctly, we probably won’t need to modify it manually by code.
Installing themes
We can compare themes with plugins. Within our site, we may have multiple themes installed, meaning they are ready to use, but unlike plug-ins, only one theme can be active at any given time. Like plugins, themes are also archived in zip archives.
If we open the option Appearance from the administrative navigation, we will see that the installed themes are displayed in the central part through images, while the section on the left side of the navigation has several sub-options.Appearance
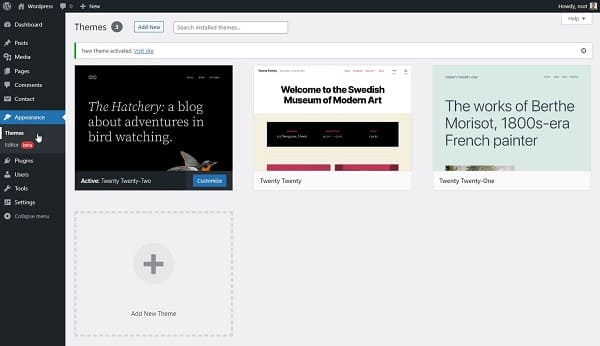
Image 7.4. Appereance – Themes admin page
In the image above, we notice that the theme Twenty Twenty Two is active, while the other two are installed but inactive. If we move the mouse cursor over any theme, the button Theme Details, will be displayed in the center, which gives us the dialog with additional information about the theme. In the lower right corner of the active theme, you can find the option Customize, which is also in the administrative navigation on the left as the second setting. When we hover over an inactive theme, in the same lower right corner there are options for activating a certain theme (Enabled) and a preview of the mode what the site with that theme would look like (Live Preview). Changing the theme, even if we later return to the previous theme, can disrupt the elements and settings, which is why the Live Preview option is very useful.
Adding a new theme is quite simple and largely corresponds to adding plug-ins, which we already talked about. The process of adding a theme starts with the Add New option at the top of the admin page.
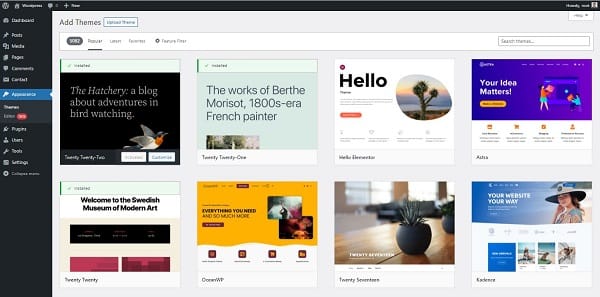
Image 7.5. Appereance – Add Themes admin page
The choice of different themes from the page https://wordpress.org/themes/ will be displayed, just like the plug-in -hate. Here we can search for available themes and install one of them directly. The similarity with plug-ins does not end there. At the top, there is the button Upload Theme for uploading the zip archive with the theme files. There are various sites that offer free themes or the option to purchase paid themes. Many of them are not found in the official repository.
| Additional Information
One of the world’s largest sites for buying themes (and related details) is ThemeForest: http://themeforest.net/category/wordpress. Here you can find different themes for the WordPress site, but also for other systems, such as Drupal, Joomla and others. |
The theme, like the plug-in, can be installed by using FTP connection. The theme needs to be extracted from the zip archive and the whole folder needs to be copied to the following location /wp-content/themes/.
Theme adaptation
In newer versions of the WordPress CMS system, we have the possibility to customize the theme through two approaches, which correspond to the options Editor and < /span>. It is important to note that the theme cannot support both options at the same time, but depending on the approach under which the theme was created, we are given one of the mentioned options.Customizer
We’ll start with the relatively newer and more modern customization option – Editor.
This option is guided by the principle of full site editing, where we have a collection of related functionalities that allow us to change all parts of the site using the blocks. The biggest advantage of this approach to theme editing is that working with blocks is intuitive and flexible, and changes to the layout of your WordPress site are easier in this case.
Before Editor, the main parts of the site design, header, sidebars, page content, footer, etc., were always determined by the theme, and I often didn’t have the option to change the appearance of these parts without writing code just for that purpose. With the Editor option we have a completely different approach to how our site looks.
| Note:
Editor is in beta development, which means that this is a new functionality of the CMS system that will continue to develop in the coming period. The beta phase also suggests that the option will change frequently within WordPress itself. |
As we mentioned at the beginning of this section, we can only use the Editor with the WordPress theme that supports it. The default WordPress theme, Twenty Twenty Two, supports both the Editor and the full site editing approach.
When we activate one of the themes that supports the Editor, we can also access its Editor option through the Appearance menu :
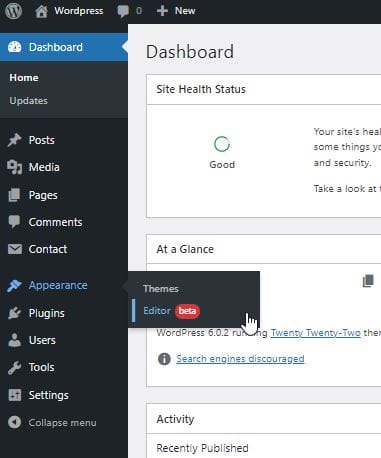
Image 7.6. The Appearance menu and the Editor item
After accessing the Editor option, we are greeted by a preview of how the user will see the site, and at the top of the interface we get a new toolbar, very similar to the one available when editing a Post or Page a site entry of:

Image 7.7. Twenty Twenty Two theme editor
- + key: As with the Post and Page inputs, we use this key to add a new block.
- Tools: the selection between the block editing mode or its selection.
- Undo: Go back one step.
- Redo: One step forward eg move through previous actions Undo.
- List View: Selecting this option displays a list of blocks already on the page.
- Templates: the name we see in the image represents the name of the template we are currently modifying. By clicking on this option, we can see all the templates available within the WordPress theme.
- Preview: by selecting this option, we have the possibility to view the page as the user will see it.
- Save: option to save changes.
- Settings: Additional display options for block and template settings.
- Styles: This option allows you to set the appearance of certain blocks at the site level.
- More Options: this element opens additional options of the site, but also of the tools.
If the WordPress theme we choose and install does not support the full site editing functionality, we will not see the option Editor in the Appearance category we find the option under the name .CustomizeAppearance For such themes, within the category .
Selecting this option displays the site as seen by visitors in the center and various settings options on the left. By changing different settings, we immediately see how these changes affect the display. In the central part, the site is displayed as it would look with the changes applied, without them actually being applied, until we select the option Save and publish from top left corner. This can be very important if we are not sure if we actually want a change we are considering.
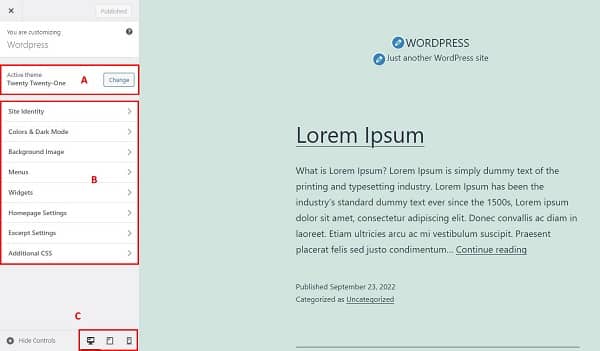
Image 7.8. Customize themes
It is also possible to change the theme itself, directly from the Customize dialog (marked with the letter A in the image above), as well as various other settings (marked with B). The specific settings depend on each individual theme. Some themes only provide for changing the site logo, while others have hundreds of settings, which can include changing element width, color, texture, site information, social media links, and more. In the video material of this lesson, you can see the options of some frequently used themes.
Since themes behave like plug-ins, it’s not uncommon for additional options to appear in the admin navigation on the left during theme activation. When using a theme, only the Theme Options sub-option will appear in the Appearance category , while others will have entire categories with many sub-options. This is generally true for paid themes with multiple options, although this is not a written rule. Below you can see the image of a popular (paid) theme.
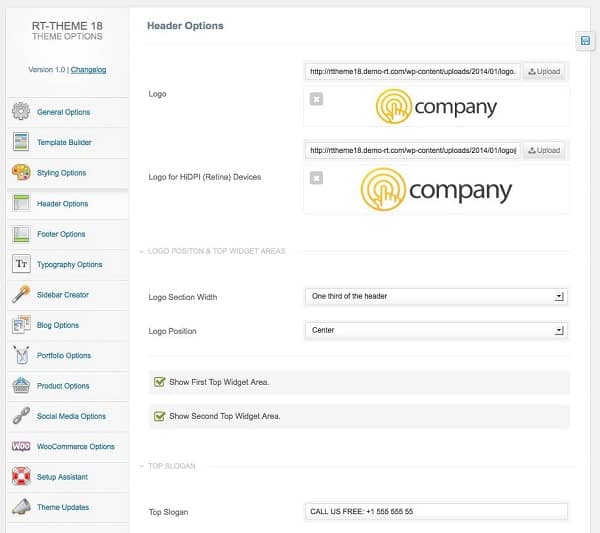
Image 7.9. Setting one of the themes
With this theme, it is possible to set the site in different ways. So, we can create two sites with the same theme without it being noticed, depending on the setting.
Widgets
Using elements, widgets on modern WordPress sites is an inevitable part of work. The widget is a specific part of the representation, it has a certain functionality that can be inserted in specifically defined regions that can accept widgets, regions that we most often call sidebars< /span> (which need not just be content pages, although the name is associated). With the help of certain widgets, in the sidebar, next to the main content, for example, we can insert popular links, a mini gallery of images or the weather forecast, or in the footer we can insert repeatable navigation, in the header we can insert search, etc. The available widgets depend on many parameters. Some are available in the WordPress core itself, others become available through certain plug-ins or by choosing certain themes, while we can create entirely other parameters.
If we use the WordPress theme that supports the Editor for theme changes, we can find widgets as a category of blocks that we can add to our page. In image 7.10. we can see that by selecting the new block we get the category Widgets:

Image 7.10. Widgets section of the editor
Adding widgets is identical to working with regular blocks, where, by dragging the elements, we can easily adjust their appearance and positions.
If we use a WordPress theme without full website editing support, the widget settings are in the Appearance category, within option Widgets.
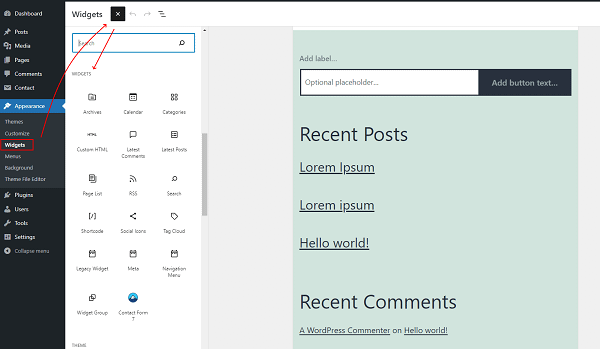
Image 7.11. Widgets
The procedure for adding a widget through this view is as follows: we add the widget by selecting the option Appearance and then the element Widgets. When a new window appears, we select the + button next to the heading Widgets. Within the new menu, scroll down to the Widgets section, where you can find all available widgets.
Activating the widget in the desired block is quite simple. We can activate it with a left click, after which the widget must be dragged to the region of the desired sidebar. When we approach the region by holding down the widget, a dashed line will appear where we could place the widget. In case there are already widgets in the region, we can put a new one above, below or between the existing widgets.
The WordPress theme consists of:
1. Screenshot taken on the website: https://developer.wordpress.org/files/2014/10/Screenshot-2019-01-23-00.20.04.png< a i=3> (Accessed: November 21, 2022)